Published online Jan 21, 2015. doi: 10.3748/wjg.v21.i3.759
Peer-review started: August 6, 2014
First decision: September 15, 2014
Revised: October 17, 2014
Accepted: December 1, 2014
Article in press: December 1, 2014
Published online: January 21, 2015
Processing time: 168 Days and 0.1 Hours
The incidence of gastric cancer remains high in South Korea. Upper gastrointestinal (GI) endoscopy, i.e., esophagogastroduodenoscopy (EGD), has a higher diagnostic specificity and sensitivity than the upper GI series. Additionally, EGD has the ability to biopsy, through taking a tissue of the pathologic lesion. Successful training of EGD procedural skills require a few important things to be learned and remembered, including the posture of an examinee (e.g., left lateral decubitus and supine) and examiner (e.g., one-man standing method vs one-man sitting method), basic skills (e.g., tip deflection, push forward and pull back, and air suction and infusion), advanced skills (e.g., paradoxical movement, J-turn, and U-turn), and intubation techniques along the upper GI tract (e.g., oral cavity, pharynx, larynx including vocal cord, upper and middle and lower esophagus, gastroesophageal junction, gastric fundus, body, and antrum, duodenal bulb, and descending part of duodenum). In the current review, despite several limitations, we explained the intubation method of EGD for beginners. We hope this will be helpful to beginners who wish to learn the procedure.
Core tip: The demand for esophagogastroduodenoscopy (EGD) has been increasing annually, especially in Asian countries. However, it is challenging to learn the procedure, due to its long learning curve. Therefore, care must be taken in teaching, learning, and practicing the procedure. We believe that if beginners learn how to perform EGD properly through an adequate training program and then perform the procedure effectively on patients, the safety and satisfaction of patients undergoing EGD will be improving.
- Citation: Lee SH, Park YK, Cho SM, Kang JK, Lee DJ. Technical skills and training of upper gastrointestinal endoscopy for new beginners. World J Gastroenterol 2015; 21(3): 759-785
- URL: https://www.wjgnet.com/1007-9327/full/v21/i3/759.htm
- DOI: https://dx.doi.org/10.3748/wjg.v21.i3.759
South Korea has a high prevalence of gastric cancer[1], hence upper gastrointestinal (GI) endoscopy, i.e., esophagogastroduodenoscopy (EGD), potentially has great significance in terms of gastric cancer screening[2]. EGD is a useful procedure for the diagnosis of various abnormalities of the upper GI tract[3-6]. The sensitivity and specificity of EGD exceeds those of radiographs such as an upper GI barium series, for the diagnosis of upper GI tract inflammations, ulcers, and neoplasms. EGD is one of the most common procedures in South Korean clinical practice[7], hence acquisition of the skills and expertise for this technique is highly desired among beginners, including primary care physicians[8-11]. It is important for new practitioners of EGD to have a theoretical knowledge of pathological GI lesions in order to correctly interpret findings during endoscopic procedures and to arrive at the right clinical decision[9,12]. However, even those armed with an in-depth theoretical knowledge of pathological legions may end up doing an incomplete examination, if they are unable correctly to insert the scope into the oral cavity of the examinee or advance it properly along each portion of the upper GI tract. Additionally, it is necessary to thoroughly observe throughout the procedure, considering the possibility of blind spots, so as not to miss any pathological legions. Consequently, it is nearly impossible to perform a successful EGD without procedural skills. Therefore, an early session of endoscopy-training programs must focus on procedural skills of upper GI endoscopy[12,13].
Like all other procedures, upper GI endoscopy is difficult to explain verbally and in writing because the standards of endoscopy procedural skill assessment are very subjective. Furthermore, an EGD is a relatively invasive procedure carried out on a real human body (examinee), which can make practice and teaching difficult for residents, fellows, and even instructors. Endoscopy without proper preparation is inadvisable. It is helpful and has been repeatedly proven effective to acquire endoscopy procedural skills from text and photos[14-16]. Therefore, we explain the operation in depth, including insertion and advancement techniques of the scope in addition to providing the background knowledge that will help beginners, including residents and fellows, who are undergoing training to learn the procedure.
Typically EGD is performed to observe the oral cavity and larynx including the vocal cord, in addition the esophagus, stomach, duodenal bulb, and second portion (descending part) of duodenum. It is desirable to observe and take images of even the ampulla of Vater (AOV) while the endoscope is advanced into the second portion of the duodenum, however, it is not always possible to take such images, because the endoscope used is not a side-viewing endoscope, but is a kind of forward-viewing endoscope[17]. An examiner may need to abandon AOV imaging after, several attempts, as continued attempts would aggravate the examinee’s discomfort.
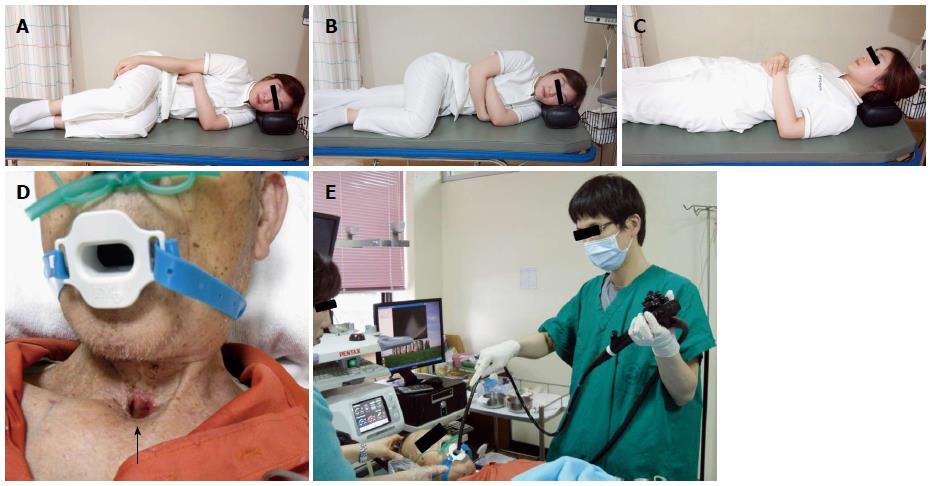
Examinee (patient): The basic posture that examinees often take during EGD is the left lateral decubitus position, or if they experience difficulty lying in that manner, they can be examined in the supine position (Figure 1)[18]. However, except for cases in which the left lateral decubitus position is contra-indicated, such as hemiplegia, quadriplegia or tracheotomy, it is extremely rare that the EGD is performed in a supine posture.
The abdomen is dilated by injecting air into the lumen, allowing for accurate observation. As a result, an examinee should wear comfortable patient clothing, or if casually attired, the patient should loosen tops, bottoms, and belts. As the stomach can be dilated by increasing intra-abdominal pressure, an examinee lying in the left lateral decubitus posture is required to bend the legs by flexing the knee and hip joints, or straighten the left leg while bending only the right leg during the examination.
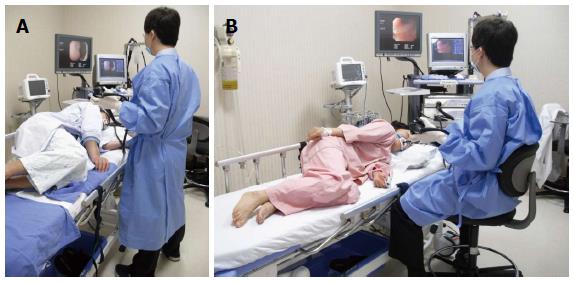
Examiner (endoscopist): While a colonoscopy can be done by either by the one-man or the two-man method[19], EGD is performed by the one-man method. While it can be done with the one-man standing method or the one-man sitting method depending on the examiner preference, EGD is usually performed using the one-man standing method because it is faster; however, if an examiner is required to do a large number of examinations in a short time or if the standing posture exerts too much strain on the examiner, such as in cases of pregnancy, the sitting posture may be recommended (Figure 2)[20,21].
Just as understanding the basics of a vehicle is helpful in learning to drive, understanding the upper GI endoscopy equipment can be helpful in developing procedural skills. Endoscopic equipment consists of two sections; the main body including the central processing unit and the endoscope. The endoscope is the main tool of EGD.
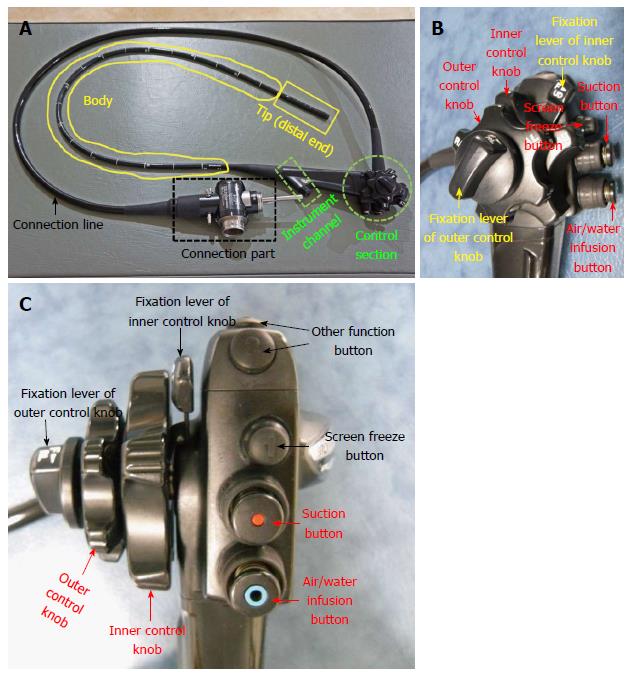
The endoscope consists of a control section, an instrument channel (forcep, snare, injector, and clip device), a shaft (the endoscope portion actually inserted into the patient), the tip (the distal end of the shaft; controlled by the control section), the connection section, and a line (Figure 3).
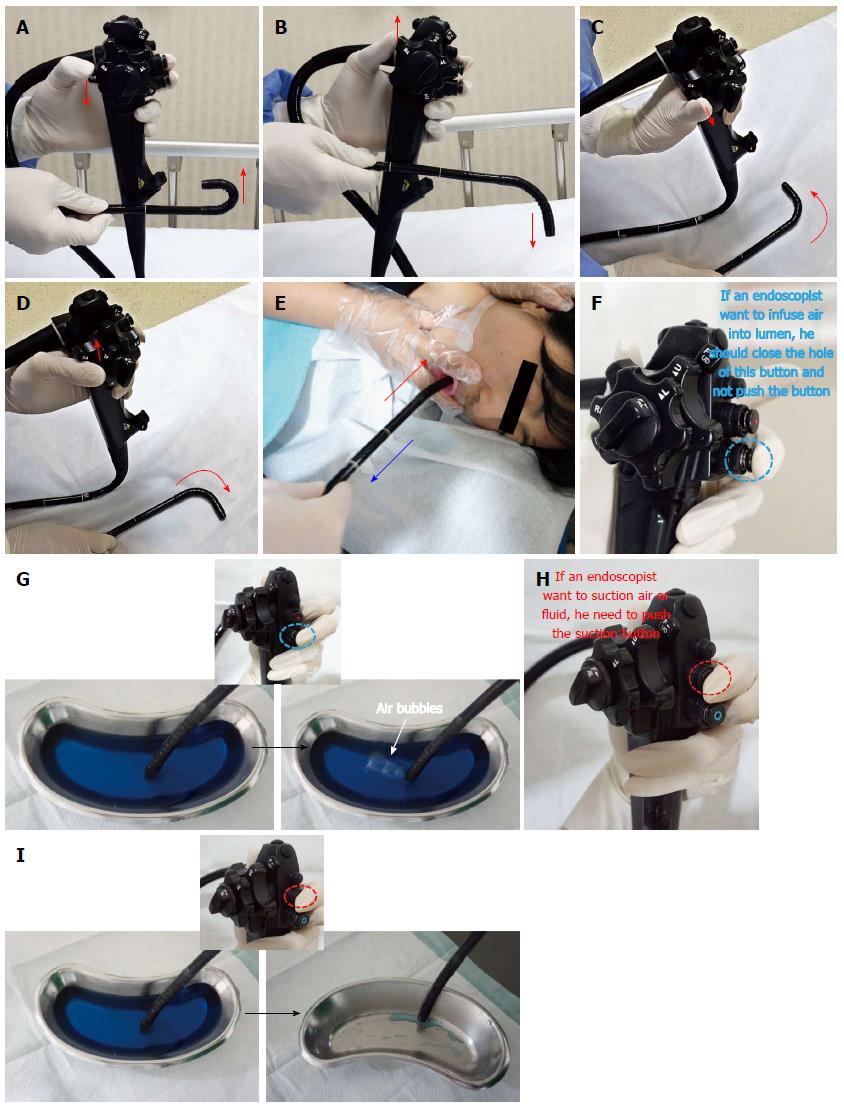
Tip deflection: Vertical (up/down) and lateral (left/right) tip deflection is a basic technique for EGD, performed using a control knob. There are two control knobs in the control section of endoscope. The larger, outer control knob is used for the vertical (up or down) movement of the tip and the smaller, inner knob is used for the lateral (left or right) movement of the tip.
Push forward and pull back: Push forward (PF) is the action of pushing the endoscope tip forward through the anus, whereas pull back (PB) is the action of pulling it backward. PF is essential for advancing the endoscope. However, PB is also important in some cases, such as when there is a red-out sign. If the endoscopist uses force despite a red-out sign, complications such as mucosal damage and perforation may occur.
Right and left turn: Right or left turns are accomplished by twisting the body of the endoscope to the right (clockwise) or left (counter-clockwise) direction using the right hand. The body of the endoscope is grasped by the right hand, angling the tip using the inner control knob by left hand. Similarly, applying a twisting (right or left) motion when the tip is deflected upward has the effect of turning the endoscope to the right or left without using the left/right control knob. Alternatively, the outer control knob (left/right) can be used. However, during EGD, the former method is far more preferable.
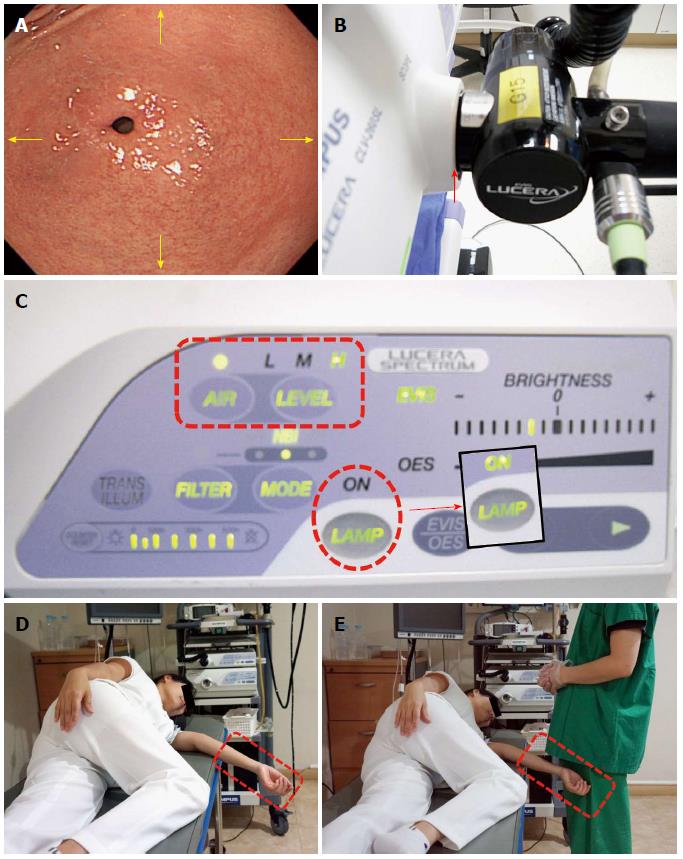
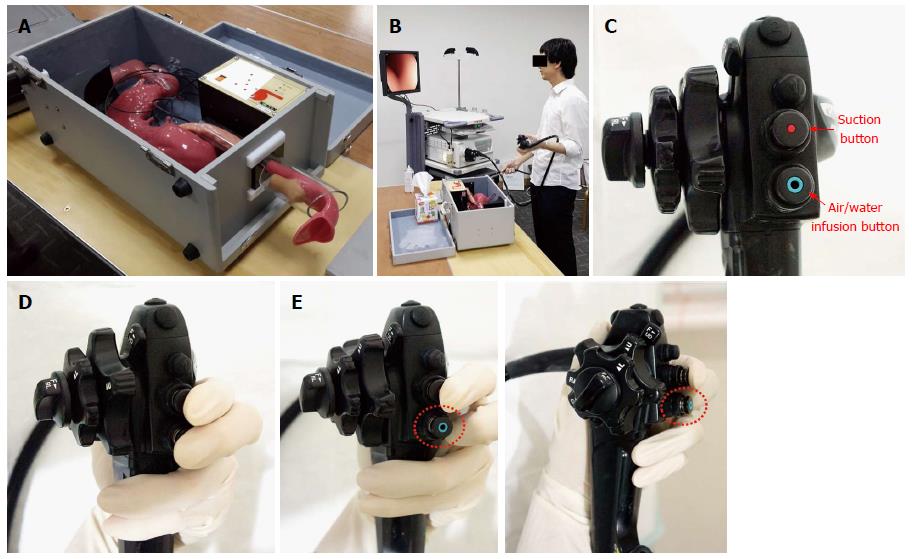
Air insufflation and suction: Air infusion and suction are performed by using the air/water infusion valve button and the suction valve button, respectively. In EGD, optimal visualization required so that pathologic lesions are not missed. Adequate visualization of the upper GI tract, especially the stomach, may be achieved by distending the stomach with air. Thus, in clinical practice, the air infusion level is set to a high level and endoscopists are required to infuse sufficient air into stomach in order to fully observe the organ and remove any blind spots (Figure 4).
The methods of inserting the endoscope and advancing it along each section of the upper GI tract may vary depending on the endoscopists; there is no single definite way of intubation. However, if one beginner carefully observes how a skilled endoscopist performs the procedure, he or she will find slight but consistent differences in the way of inserting and advancing the scope. Herein, we delineated a universal insertion method for each anatomical part of the upper GI tract and offer related knowledge helpful to the beginner.
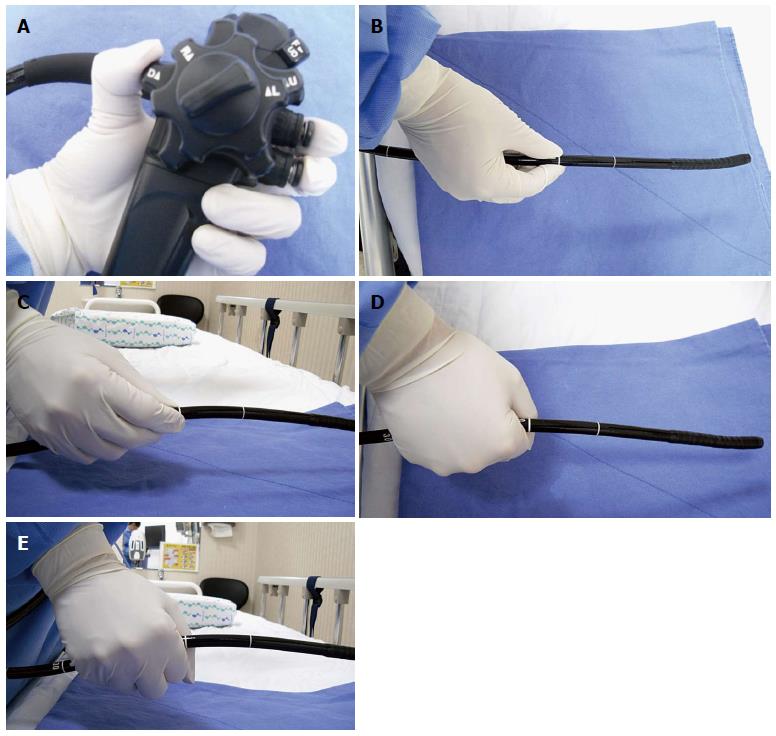
Although gripping methods are based on examiner preference, the left hand usually grabs the control section and the right hand pinches the distal end of the scope. After resting the control section in the left palm, the left hand grips the scope with the fourth and fifth fingers. With the first finger on the large angle knob, the second finger on the suction button and the third finger on the air/water supply button, an examiner can freely manipulate the scope with the tip of each finger. The right hand holds the distal end of the scope at the correct distance from the tip. If held it too far from the tip, the scope will bend, and force is not transmitted to the tip. If held too close to the tip, an examiner will have less flexibility in advancing the scope. In ordinary situations, the endoscopist holds the scope approximately 15-20 cm from the tip. However, as a stronger force is required to advance the scope from the pyloric ring into the duodenal bulb, an examiner may hold it closer to the tip than usual. When holding the distal end of the scope, an examiner can grip it with either the shake hand method or the pen holder method. Regardless, the physician should avoid holding the tip of the scope with a clenched fist, as that will result in a loss of flexibility (Figure 5).
Overview: (1) Before EGD is performed on a patient, an endoscopist is required to quickly check all the necessary conditions, including the function of the endoscope, his or her own physical condition, and the examinee’s posture and preference of sedation[22]; and (2) as a beginner, it is not so important to identify how an examiner manipulates an endoscope during insertion to influence the movement and location of the scope within the body. It is more important is to keep in mind that the movement of the endoscope should coincide with the location and movement displayed on the screen. Although a well-skilled endoscopist may be well aware of the 3-dimensional movements and deflections of the scope within the patients’ body, a beginner is required to concentrate on the scope’s upward and downward movements displayed on the screen (Figure 6).
Important points for beginners: (1) It is important to check whether the scope is well connected to the mainframe before examination. An examiner will encounter problems during examination due to poor air-insufflation if the connection is sub-optimal; (2) it is especially important during EGD to rapidly dilate and contract the stomach to enable advancement of the scope at a high level of air insufflation; and (3) as mentioned above, the examinee should lie in the left lateral decubitus posture during the upper GI endoscopy. If the arm of an examinee protrudes out of the bed during this time, it can interfere with the examination. The right arm of an examinee should be placed on his or her hip, while the left arm should be on the chest. Alternatively, an examinee can fold their arms across the chest.
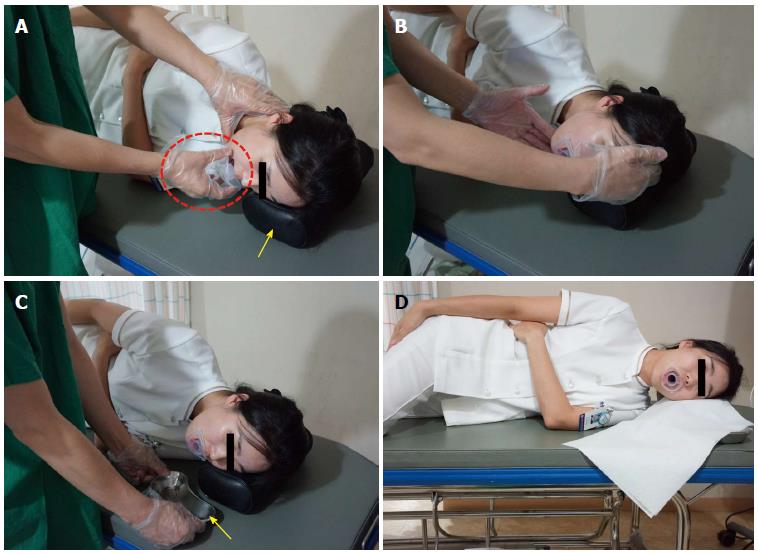
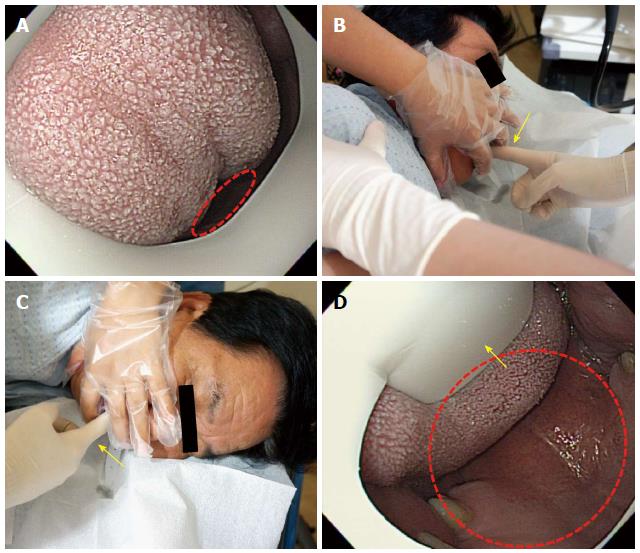
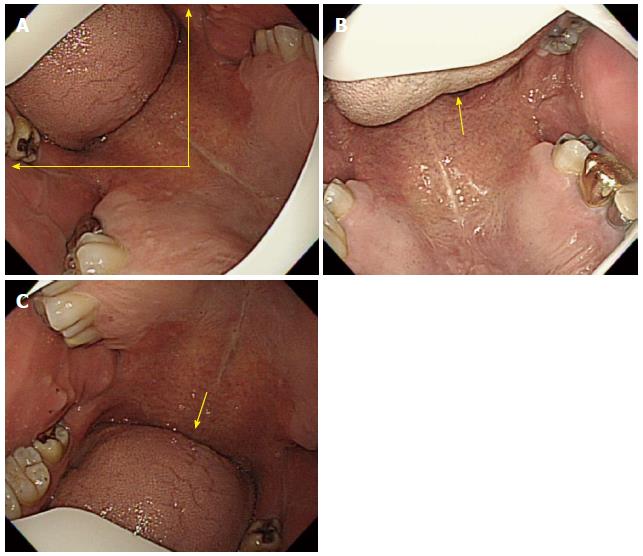
Overview: (1) It is important to check whether the mouthpiece is properly placed in the mouth of an examinee; if the tongue blocks the opening, an examiner should instruct an examinee to place his or her tongue in the lower part of the mouth. If an examinee does not follow the instruction well or in case of a sedated endoscopy, an examiner should insert his or her index finger into the examinee’s mouth to place the tongue in the lower part of the mouth. A mouthpiece with a tongue restrainer can be of great help; (2) after securing the space above the tongue (in the lower side on the screen), an examiner should insert the scope through the mouthpiece. Before inserting the scope, it is important to check the location of the tongue on the screen of the monitor and ensure that it is placed between the 9 o’clock (the upper left on the screen and 12 o’clock (the upper side on the screen) positions; and (3) once the tongue is properly placed, an examiner should insert the scope along the middle line of the soft palate. When advanced approximately 5-7 cm, the scope will reach the tongue base (tongue root), where the uvular can be observed. The anatomical location of the uvula is curved in a downward direction but will appear bent at an upward direction, on the screen. If the section is only slightly curved in an upward direction with the scope in in a neutral position, the endoscopist can advance the scope further without manipulating the scope. However, if the upward curve angle is sharp, an examiner can use the up/down angulation control knob to deflect the distal end of the scope more acutely upwards. At this point, it is important to deflect the scope slightly to the left (left turn) toward the space on the left side of the uvula. When the uvula is irritated during the insertion of the scope, an examinee may feel uncomfortable or nauseous. After passing this section, the scope will enter the hypopharynx or laryngeal pharynx, which is the distal end of the pharynx where the vocal cord, both pyriform sinuses, and various cartilages are observed.
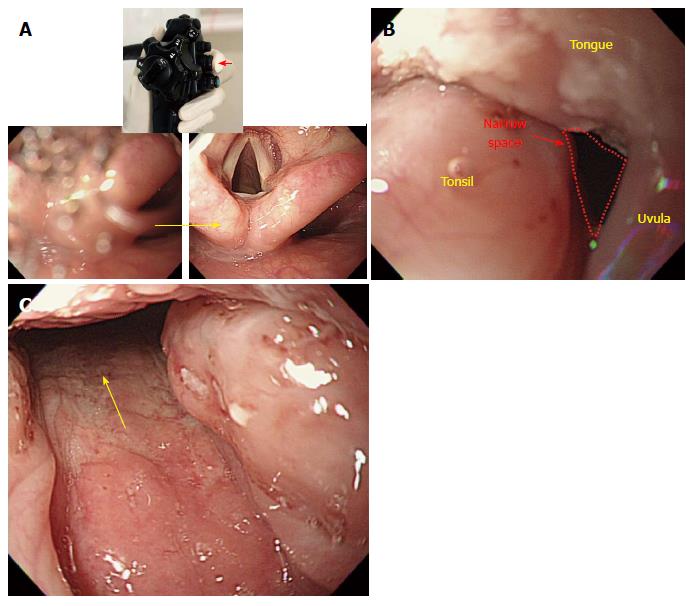
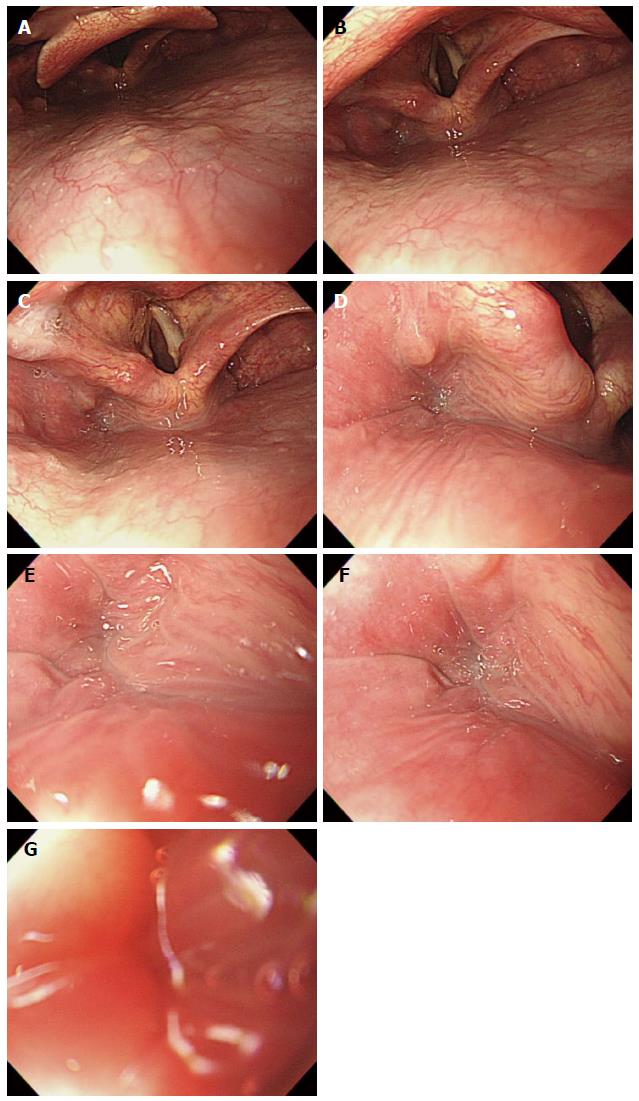
Important points for beginners: (1) The section from oval cavity to the pharynx is one of the most difficult parts of upper GI endoscopy. It is important for a beginner to carefully observe an advanced endoscopist performing EGD; when given a chance the beginner should attempt a careful insertion of the scope into an examine. We recommend practicing with a model of a human body which can also be helpful in learning the procedure[23]; (2) just as in the oral cavity to pharynx section, an examiner must not insufflate air through the section comprising the pharynx to the esophagus, which will be explained later in this review. Air insufflation in this section can irritate the vocal cord, which in turn causes a coughing reflex. According to the operating principle of an endoscope, air is infused when the air/water control button is in the neutral position (located right below the suction button), whereas a few droplets of water can emerge from the distal end when the air/water button is depressed. Since air and water are supplied through the same channel, a few droplets of water can emerge together with air and enter the esophagus even when the vent is blocked for air insufflation, which can also trigger the coughing and vomiting reflexes. Therefore, a beginner should bear in mind that an examiner should not block the vent on the air/water button (i.e., insufflate air) after inserting the scope into the oral cavity, until the distal tip is advanced into the upper esophagus; (3) saliva can physiologically drain into the examinee mouth, if opened. There are two important factors regarding this point: if an examinee swallows saliva, it can cause coughing and vomiting reflexes; and saliva can compromise the visibility of the scope and interfere with its advancement[24]. Therefore, it is very important for an examiner to instruct an examinee prior examination not to swallow saliva but let it fall from the mouth into the collecting container; it can be helpful to push the suction button to remove saliva from the mouth during the insertion; and (4) even though adults usually do not have enlarged tonsils, some patients can have swollen tonsil either due to inflammation, such as tonsillitis and pharyngolaryngitis, or due to anatomical traits. In this case, even though the uvula and the tonsil appear to block the opening, it is still possible to perform the procedure. Advancement of the scope between the uvula and the tonsil should be attempted, as it will cause the soft tissues of the tonsil to be pushed back and allow for the smooth passage of the scope (Figure 7, Figure 8, Figure 9, Figure 10, Figure 11, Figure 12).
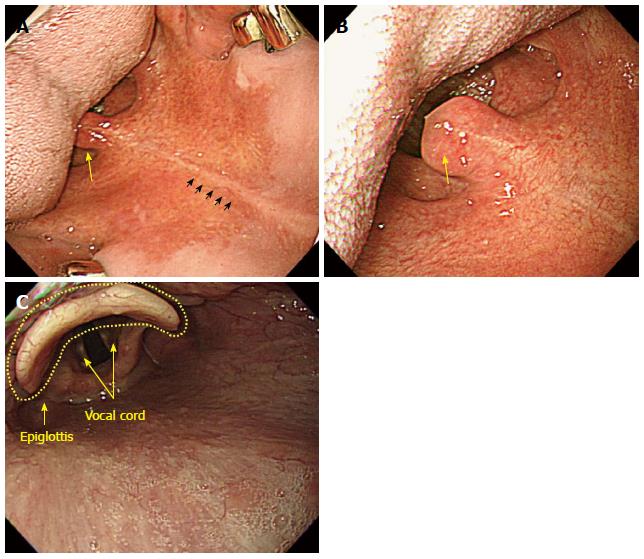
Overview: (1) The vocal cord is clearly observed below the epiglottis when the distal tip reaches the lower end of pharynx. The scope should by no means be inserted into the vocal cord. If the scope is mistakenly inserted into the vocal cord, the cricoid cartilage can be observed, and this causes a severe cough reflex and dyspnea. If this occurs, the scope must be pulled back immediately; (2) the larynx is mainly involved in sound production and is located above the air way, situated the trachea below and the hypopharynx posteriorly. The larynx is strongly pulled back by the cricopharyngeal muscles, while the hypopharynx is divided at the esophageal entrance into the right and left sides. Therefore, the center of the hypopharynx connected to the esophagus appears blocked, while the left and right sides appear slightly recessed. Usually, the hypopharynx appears to be closed ended, as it is contracted by the upper sphincter. The hypopharynx is connected to a upper esophagus through a section termed the pyriform fossa, or pyriform recess, or pyriform sinus, whose unique shape has earned it nickname descriptors such as gourd-shaped conclave and pear-shaped conclave; (3) we have provided several tips for advancing the scope through this section. First of all, as an examinee lies in the left lateral decubitus posture in most cases, the scope should be advanced into the left side of the pyriform sinus in keeping with gravity. While advancing along the left side of the pyriform sinus, the examiner should begin to insufflate air by placing a finger on the vent of the air/water button. In the pharynx, air infusion is contra-indicated. At the same time, the examiner is required to push the scope carefully with just a little force. It can be helpful for the examiner to raise his or her left hand holding the control shaft, above the head of an examine, or to slightly twist his or her right hand, which is holding the scope in a clockwise direction; and (4) as the passage of the scope through the larynx occurs continuously, an examiner can momentarily lose sight of it. However, if an examiner attentively employs the above mentioned operating skills, he or she will ultimately be able to advance the scope into the upper esophagus.
Important points for beginners: Unlike the colonoscopy, EGD has almost no risks of perforation. The only section with a potential risk of perforation is the pyriform fossa, which is the entrance into the upper esophagus from the hypopharynx[25]. Actually, several EGD research reports have emphasized that an examiner should not exert too much pressure when passing the scope through this section. However, it has been my experience that beginners are often overly and unduly obsessed with it and consequently experience difficulty advancing the scope through this section. As a result, the typical beginner does not exert enough force, and ultimately failure to enter the esophagus. However, it should be emphasized that when the scope is advanced through the pyriform fossa, too much strain must be avoided due to the potential risk of perforation. Conversely, if an examiner does not place enough force to the shaft, he or she may fail to penetrate the upper esophagus even in normal situations, due to resistance from the upper esophagus sphincter. Therefore, an adequate amount of force is recommended to penetrate the shaft into the upper esophagus. An “adequate amount of force” is very subjective, hence an examiner will benefit from prior experience. Broadly stated despite its subjectivity, endoscopists are required to exert force as if gently making a fist with the right hand.
Propofol used for a sedated endoscopy, is effective in preventing vomiting and relaxing the upper esophageal sphincter (UES). Combinations with or a single administration of propofol can help the beginner to successfully penetrate the distal tip of the scope into the esophagus[26]. Additionally, when performing an endoscopy without sedation, it can be of great help if an examiner verbally instructs an examinee to “try to swallow the scope” or pushes the scope in synchronization with the examinee’s swallowing movement.
Although advancing the scope in the left side of pyriform sinus is recommend based on the examinee’s posture as mentioned above, it is not applicable to every case. There are some cases in which advancing the scope through the left side of the pyriform sinus is quite difficult. In such cases, it is better to redirect the scope toward the right side of the pyriform fossa rather than attempt to proceed along the left side.
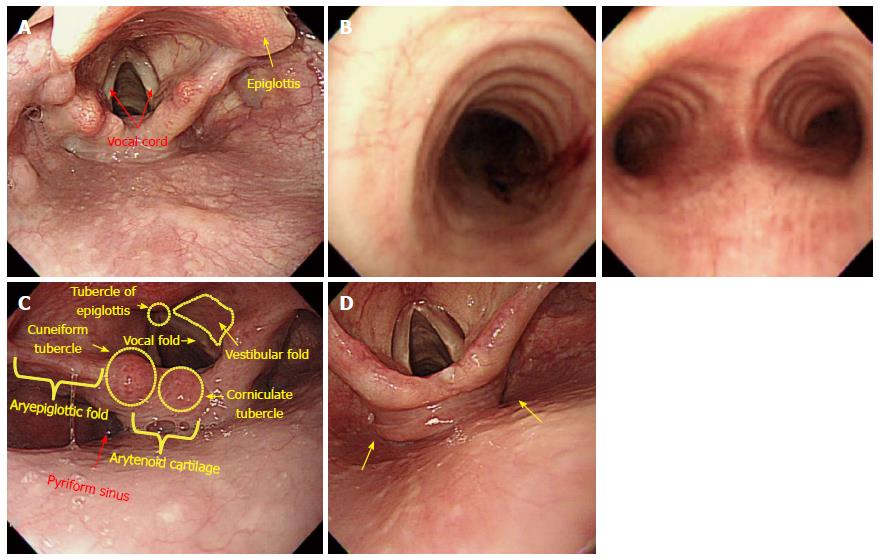
The primary focus of EGD is the examination of the esophagus, stomach, and proximal duodenum (usually up to the second portion). Incidental upper airway lesions can be identified in the pharynx and larynx, including those of the epiglottis and vocal cords, during the insertion and withdrawal of the endoscope to and from the esophagus. Therefore, this area should be examined thoroughly during the insertion as well as the withdrawal of the endoscope (Figure 13 and Figure 14).
Overview: (1) The advancement of the scope into esophagus is not difficult, and may be one of the easiest parts of EGD intubation. The esophagus refers to the anatomical region which ranges from the UES to the gastroesophageal junction (GEJ), which is subdivided into three portions: upper, middle, and lower. Despite possible differences between examinees, the UES is usually located about 15 cm away from the incisor, while the GEJ lies 45 cm away from it; (2) Overall, it can be said that the scope is advanced in a straight linear direction in the esophagus, though there are times when slight twisting and deflection of the scope are required. When the scope advances into a section that is 10 cm away from the UES (the starting point of the upper esophagus), tracheoesophageal compression by the aortic arch can be visualized, which is commonly called the upper esophagus. By dividing the remaining portion from this point (tracheoesophageal compression by aortic arch; physiologically the second constriction) to the GEJ, the upper half is termed the middle esophagus, while the remaining half is the lower esophagus; and (3) Similar to the advancement of the scope into the esophagus, it is also difficult to insert the scope from the GEJ (the end part of the esophagus) into the lumen of the stomach. However, it is more important to observe the GEJ; if an examinee follows the instructions of an endoscopist well in a non-sedated or even a sedated endoscopy, an endoscopist should ask the examinee to breathe in to inflate the GEJ so that he or she can clearly observe it.
Important points for beginners: Intubation into the esophagus is not difficult. Hence a detailed explanation is not required. Instead, we would like to provide beginners with some helpful tips to advance the scope into the esophagus as follows: (1) continuous air insufflation throughout the entire esophagus is helpful in advancing the endoscope. The lumen of the esophagus is 15-20 cm wide, which is not spacious enough to comfortably advance the scope. Therefore, air insufflation is required to guide the endoscope into the esophagus as well as for observation. The next portion into which the endoscope is advanced after the esophagus, is the stomach. While a well-skilled endoscopist can advance the scope into the stomach without even inflating the stomach, it is difficult for a beginner to advance the scope without air insufflation. Continuous air insufflation into the lumen of the esophagus, while the scope is being advanced from the esophagus, can help the examiner to insert the scope into the stomach through the GEJ without triggering the vomiting reflex. Therefore, the EGD has an advantage, in that intubation from the esophagus into the stomach can be done without much difficulty; (2) In principle, the intubation from the esophagus into the stomach is done in a straight linear direction as mentioned above. However, a beginner should remember that the distal tip of the endoscope needs be slightly deflected in some parts of the esophagus unlike the straight line intubation displayed in the schematic diagram. There are some cases in which an esophageal web is observed especially in the GEJ section. In that case, an examiner should avoid using too much power when pushing the scope. Instead, it is recommended to advance the scope using a slight rotation in order to position the center of the esophageal lumen in the middle of the screen; (3) although extremely rare, great attention and care is required when a diverticulum is observed in the esophagus. A diverticulum is made up of very thin walled pouches or sacs formed by herniated protrusion of mucous membranes, without a muscle layer. Therefore, the scope must be pulled back immediately, if it is mistakenly inserted in a wrong direction. If a diverticulum is mistaken as the lumen and the scope is advanced in that direction, there is a risk of perforation; and (4) an endoscopist should use extra attention and care when advancing the scope in case an esophageal varix is observed in an examinee. The surface of an esophageal varix is extremely thin, hence great care is required to ensure that the scope does not touch it. If an examinee has a vomiting reflex, the examination should be quickly done to ensure that the examinee becomes stabilized. In this instance, where the examinee has a known severe vomiting reflex, an EGD in a deep sedation state can be paradoxically safer than a non-sedated procedure. An endoscopist must make an informed decision, taking all these factors into consideration (Figure 15).
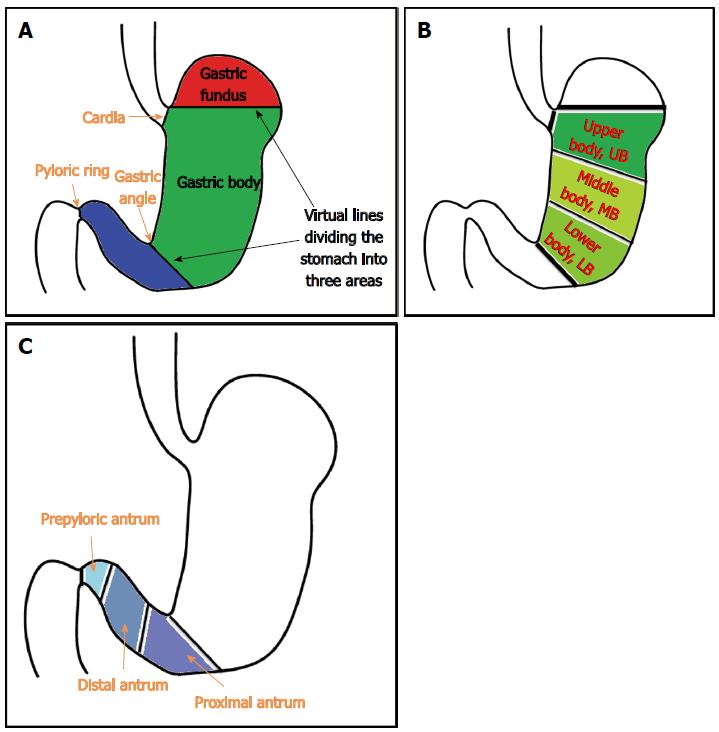
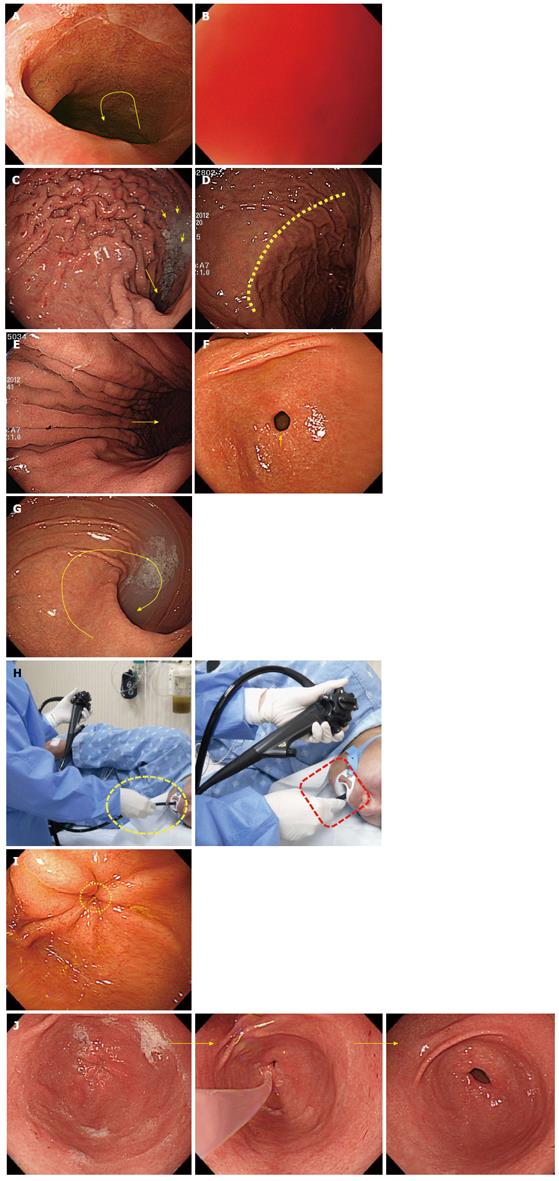
Overview: (1) on the basis of anatomical landmarks of high reproducibility such as the cardia, gastric angle and pyloric ring, the stomach is subdivided into the fundus (fornix), body and antrum. The gastric body is further subdivided into the upper body (UB), middle body and lower body, while the antrum is subdivided into the prepyloric antrum, distal antrum and proximal antrum; (2) the lower esophagus passes through the diaphragm near the GEJ and has a curved progression toward the left posterior side. Therefore, when the scope passes through the GEJ into the stomach for the first time, the scope needs to be rotated anticlockwise (left turn); in some cases, the distal tip of the shaft needs to be deflected in the upward direction. If the scope is pushed in a linear fashion without such manipulations, the scope will penetrate the GEJ to reach the posterior wall of the UB. This will lead to a “red-out” sign, which will compromise visibility; (3) a “red-out” sign is not inherently problematic. The scope must be pulled back just a little. At this point, it is recommended that the endoscopist secures better visibility using air inflation. If clear visibility is not achieved after pulling the scope slightly backward, it may be withdrawn as far as the lower esophagus through the GEJ. Then, it is recommended that the scope be inserted from the lower esophagus into the stomach again, while continuing to insufflate air into the lumen of the stomach from the GEJ; (4) if the scope is properly inserted into the stomach, a gastric fold, the greater curvature of the body of the stomach will be typically observed. There are many cases wherein gastric juice retention is detected. The watershed, which is an elevated area, along which the gastric fundus and body are divided, can be observed depending on the individual examinees or the air insufflation; (5) unless the stomach is reversed to the right side (situs inversus), the direction of insertion is mostly oriented to the right side (right middle, right upper or right lower). Therefore, if an examinee pushes the scope by rotating it to the right, which is the same direction as the fold, the scope can enter the antrum of stomach without much difficulty; (6) there are some cases where beginners feel embarrassed to see that the intubation is oriented to the left side on the screen. However, as a right-sided stomach is extremely rare, it is reasonable to first suspect that a beginner might have made a mistake operating the scope rather than of a case of situs inversus. This is caused mainly by a manipulation mistake of rotating the scope to the left too sharply when inserting the scope into the cardia from the GEJ. In that case, the scope must be withdrawn to be reinserted, or it must be redirected toward the right side by readjusting the left rotation angle. It is recommended that the endoscopist manipulates the scope as described above, when such a problem is encountered; (7) when the scope is inserted along the fold of the greater curvature of the body of stomach, the endoscopist will observe the antrum of stomach where there is no fold. Advancing the scope further into the distal antrum will allow the examiner to observe the pyloric ring, which leads to the duodenal bulb; and (8) unless the pyloric ring is deformed due to ulcer scars in the duodenum, it is usually observed to have a circular shape. At this point, it is important for an endoscopist to place the pyloric ring in the middle of the screen before trying to insert the scope into the duodenal bulb. After positioning the pyloric ring at the center of the screen with a combination of up/bottom and left/right deflections and twists, the endoscopist will be able to pass the scope through the pyloric ring to enter the duodenal bulb without much difficulty, if he or she gently pushes the tip of the scope into the pyloric ring.
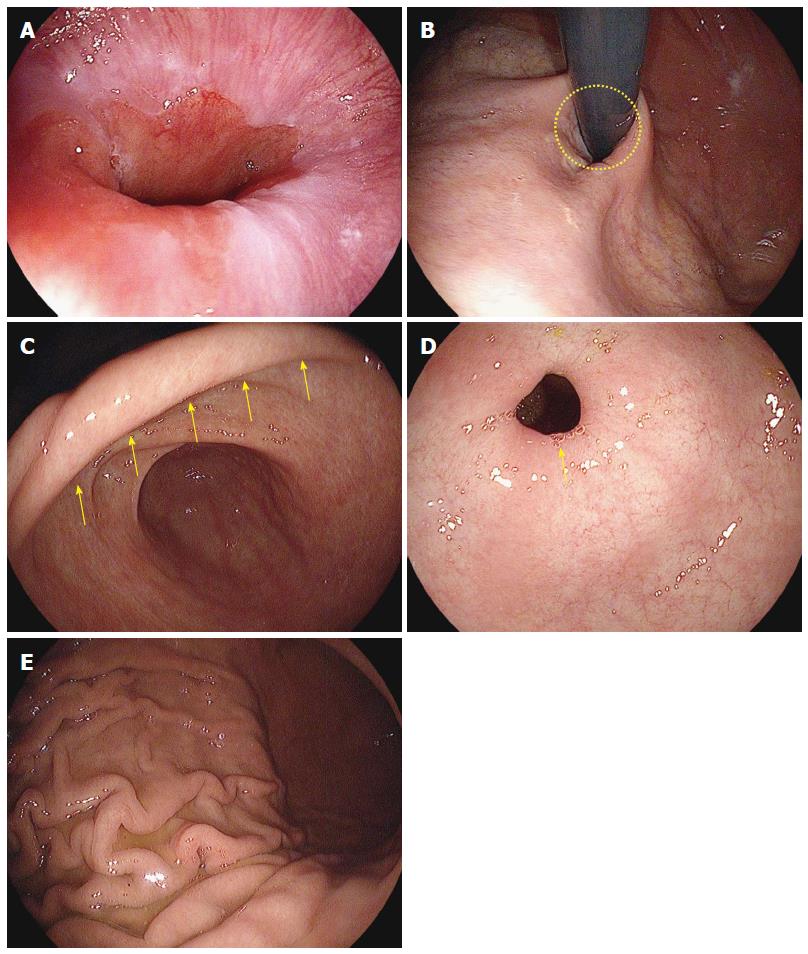
Important points for beginners: (1) a limited low level of air insufflation during the advancement of the scope into the stomach can help reduce the insertion route and time by shortening the stomach’s longitudinal axis. Therefore in principle, it is recommended to use the smallest amount of air insufflation necessary during the EGD; an experienced endoscopist is able to pass the scope through the anatomical section without any air insufflation of the stomach. However, a beginner cannot identify the direction of scope’s advancement without inflating the stomach somewhat. Accordingly, it is recommended that beginners infuse air into the stomach, even though it will extend the insertion route. In particular, when the scope is inserted into the stomach through the GEJ, the examiner should provide enough air into the lumen of the stomach so he or she can determine the direction of scope advancement; (2) retention of gastric juice occurs in the greater curvature of the body of stomach in normal conditions, even if an examinee went on a fast prior to the examination. It appears opaque when mixed with a premedication (e.g., simethicone solution) for the EGD or mucus materials. In principle, an examiner should suction the gastric liquid when it is observed, while withdrawing the scope. But if an excessive amount of gastric liquid interferes with the advancement of the scope, it may be helpful to suction while inserting the scope into the stomach; (3) the most challenging stomach shape for beginners is the so-called “cascade stomach”[27]. When the scope is advanced into the stomach through the GEJ, the watershed between the gastric body and fundus can be observed, and the greater curvature of stomach can be seen on the right side of the watershed. The cascade stomach refers to the one that appears like a waterfall due to an acute bi-directional angle and curve. In the cascade stomach, the fundus descends into the “body” of the stomach and makes a sudden turn or curve, to move upward toward the examinee’s back. Therefore, if the scope is pushed while rotating to the right side as usual, the scope will bend in the fundus, which makes it impossible to advance further. For the smooth advancement of the scope into the cascade stomach, it is recommended that the endoscopist push the shaft hard while twisting it at a sharp angle with the right hand, after flattening an acute curve angle from the fundus to the gastric body by relieving the inflation pressure in the lumen of the stomach with air suction; (4) the insertion through the pyloric ring to the fundus can be more difficult, especially for a beginner, than any other parts of the stomach. The location of the pyloric ring is constantly changing due to peristalsis and the examinee’s respiration. In order to safely navigate this area, it is important for the examiner to hold the shaft rather short or closer to the mouth of the examinee. Furthermore, it can be helpful to hold the shaft in this manner while advancing it into the pyloric ring, because it can transfer force more effectively to the distal tip of the scope. In such conditions, the examiner should push the shaft with minimal force (as when getting close to the examinee). The scope will then advance through the pyloric ring into the duodenal bulb. An examiner must relax his or her grip immediately after entering the pyloric ring, as a precautionary measure, so that the distal tip does not hit into the wall of the duodenal bulb; and (5) the opening and closing degree and the diameter of the pyloric ring may vary depending on each examinee. Advancing the scope through an open pyloric sphincter with a wide diameter is straightforward, even for beginners. However, if a pyloric ring has a narrow diameter or is closed, a beginner may have difficulty advancing the scope (Figure 18I). To avoid such a situation in the case of a non-sedated endoscopy, an examiner can ask an examinee to make the sound “Ah” which will open the pyloric ring by relieving the abdominal pressure and reducing peristalsis. If an examinee undergoes a sedated endoscopy, the endoscopist can instead insufflate air or inject warm water toward the pyloric ring after positioning the tip of the scope close to it (Figures 16-18).
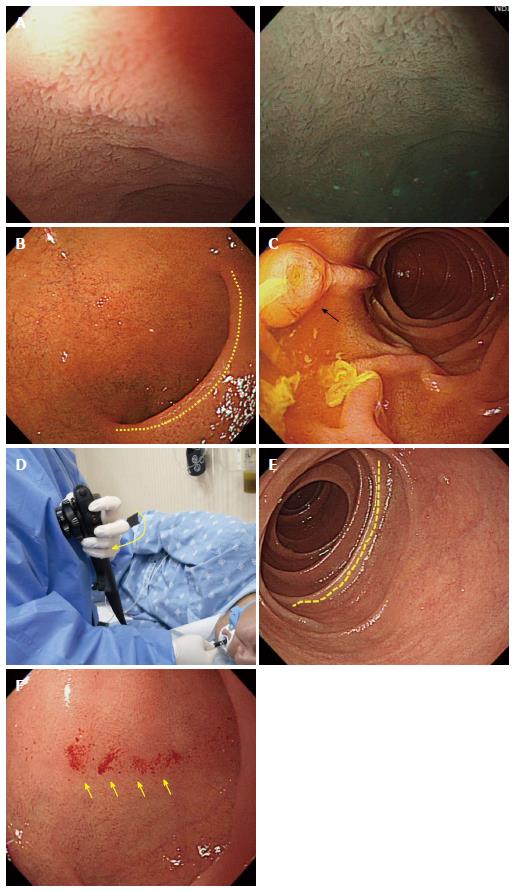
Overview: (1) Typically, villi of the mucosa of the small intestine can be observed at this point since the duodenal bulb is part of the small intestine. These villi are more clearly visible with the water-filling method or with narrow-band imaging[28,29]; (2) It is important to observe the superior duodenal angle (SDA) in the duodenal bulb. The SDA plays an important role as a landmark in identifying the location of the scope in the duodenal bulb; as the scope progresses through the second portion of the duodenum on the right side of the SDA, the angle can be used to help identify the direction an examiner should take to insert the scope into the second part of the duodenum; (3) The duodenum is subdivided into the first, second, third and the fourth portion, also referred to as the bulb, descending portion, horizontal portion and ascending portion, respectively. EGD usually progresses only through the first and second portions of the duodenum. In addition, an examiner should try to observe the AOV, while examining the second portion of the duodenum. However, it can occasionally be impossible to observe the AOV with a straight-view endoscope due to its limited visibility, and it is not always necessary to take images of the AOV; (4) to insert the scope from the duodenal bulb into the descending portion; the examiner should first position the SDA on the right side on the screen and move the scope close to the SDA. When the scope reaches the SDA, the examiner needs to advance the scope while rotating the shaft to the right. To rotate the scope to the right, an examiner can twist the shaft with his or her right hand to the right, and then the endoscopist can raise his or her left hand, which holds the control shaft toward the examiner’s chest, which is a more convenient way to penetrate the duodenal bulb. If an endoscopist fails to insert the scope into the second portion of the duodenum with right rotation alone, an endoscopist can also manipulate the up/down control knob on the inner side of the control unit to deflect the distal tip of the scope upward. After a series of such manipulations consecutively without any hinderance, the typical circular fold (Kerckring) of the descending portion of the duodenum can be observed, signifying that the tip of the scope has been inserted into the descending portion of duodenum; and (5) To take images of the AOV displayed on the screen or make a more thorough observation of the descending portion of the duodenum, a paradoxical maneuver of the scope is required. The “paradoxical movement” of the scope refers to a phenomenon where the tip of the shaft is paradoxically advanced when an endoscopist attempts to withdraw the scope from the descending portion of the duodenum.
Important points for beginners: (1) Beginners often experience difficulty performing the paradoxical movement in the descending portion of the duodenum, in which the distal tip of the scope advances as the shaft is withdrawn. It is important to know that, as the shaft is withdrawn, it is not just simply pulled back. If it were pulled back in a straight linear direction, in most cases, the distal end of the scope will end up falling into the duodenal bulb. The scope is reversed at this point because it pulled back in order to be advanced; accordingly, the scope must be reversed while being rotated to the right. This concept is similar to a torque maneuver in colonoscopies. In addition, when an endoscopist starts to withdraw the scope, it will be reversed at first. This is not a cause for concern. If it is pulled back further, the distal end of the scope continue to advance after being reversed; and (2) in principle, the upper GI endoscope will take images in reverse order after inserting the distal dip into the second portion of the duodenum. However, the authors recommend that the endoscopist take images of the pyloric ring and the duodenal bulb first before inserting the scope into the second portion of the duodenum, even if these endoscopic images overlap with the ones that are to be taken while the scope is being reversed. The reason is that even a skilled practitioner can leave scars (iatrogenic legions) owing to contact with the scope. Therefore, it is helpful to take images of the condition of the mucous membrane before trying to insert the distal tip of the scope, which can be helpful when analyzing results or explaining the results to an examinee (Figure 19).
Withdrawal of scope and observation: (1) even though observation can be accomplished before the distal tip being inserted, upper GI endoscopy usually inspects the mucosa in greater detail during the withdrawal phase. The endoscopic images are usually taken in reverse starting from the second portion of the duodenum, but it is highly recommended that images of some portions such as the GEJ, pyloric ring and duodenal bulb be taken in advance; (2) in the earlier Polaroid digital photo printing system, 4 or 8 images were usually taken and more were filmed in case of pathological legions. Recently, most medical institutions have introduced picture archiving communication systems (PACS), which allow for unlimited photo-taking. Therefore, a large number of images can be taken on a certain anatomical part depending on the judgment of an endoscopist, in addition to photos of the mandatory sections. Images that are required to be recorded include the upper esophagus, middle esophagus, lower esophagus, GEJ, front and reverse images of the fundus, front and reverse images of the gastric body (upper, middle, lower), antrum of stomach (proximal, distal, pylorus), gastric angle, pyloric ring, duodenal bulb and the lower portion of duodenum; and (3) according to the principle of withdrawal, an observation should be thoroughly conducted without missing blind spots. The possible blind spots include the cardia, lesser curvature and posterior wall of the body of stomach and all other spots which are hidden by the scope. An examiner should take extra care and attention to observe these areas in detail. It is highly recommended that the stomach be observed by adjusting the inflation with an adequate use of air insufflation and air suction.
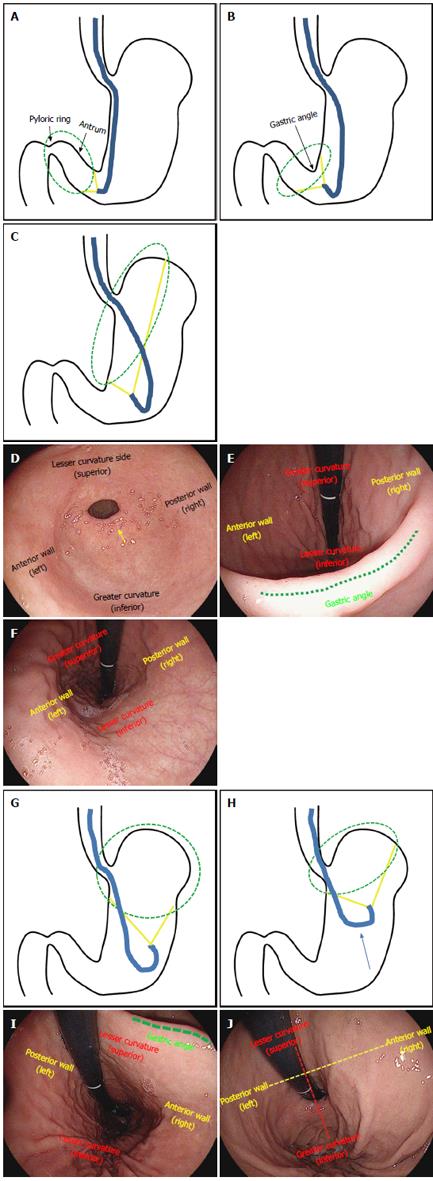
J-turn and U-turn: (1) The gastric fundus and body can be observed in anteversion during the withdrawal of the scope, but need to be inspected in retroversion in order to examine blind spots thoroughly[30]. If the scope gets deflected upward when the distal antrum is observed along with the pyloric ring, the scope will be deflected in a J-shape, which is termed as a “J-turn maneuver”, where the gastric angle is observed and the gastric body can be seen if the scope is angled up even further; (2) when maneuvering a J-turn, the location of the anterior wall is not simply replaced with the posterior wall. When observed on gastric endoscopy, the left side is the anterior wall, while the right side is the posterior wall. In contrast, the location of the greater curvature of the body of stomach is replaced with the lesser curvature; the lower side is the lesser curvature, whereas the upper side is the greater curvature. However, it is not difficult to distinguish the greater curvature from the lesser curvature, thanks to the unique appearance of their respective folds, and it is important to remember that during J-turn, the direction of the scope usually coincides with those of the anterior and posterior walls observed on the screen; and (3) a U-turn maneuver is a 180° rotation of the endoscope in a J-turn. The U-turn allows for a good visualization of the greater curvature of the gastric body, cardia and fundus. In a U-turn, a detailed observation is possible when the scope is angled upward. As a precaution, note that the orientation is different: the anterior and posterior abdominal walls are visible in the opposite direction; the right side is the posterior abdominal wall of abdomen, whereas the left side is the anterior wall (Figure 20).
The overall incidence rates for gastric cancer have steadily declined over the past 50 years[31,32]. However, gastric cancer is one of the most common causes of cancer deaths worldwide, particularly in Asian countries such as China, South Korea, and Japan[33,34]. Although it is relatively invasive procedure compared to the other examination tools such as an upper GI barium series, computed tomography (CT), magnetic resonance imaging (MRI), and capsule endoscope[35], EGD is the only method that allows for the biopsy and/or removal of pathologic lesions during the procedure, if indicated[36,37]. Furthermore, in the case a lesion suspected to be a malignant tumor or an ulcerous disease observed during the upper GI series, EGD is used to perform a biopsy and confirm the diagnosis, which makes the gastric cancer screening method quite inconvenient. Additionally, upper GI endoscopy offers color visualization of the upper GI tract with real time assessment and interpretation of the findings, through which an examiner can easily identity pathological lesions. Therefore, EGD is actively performed in South Korea as a primary screening tool for patients with upper GI diseases including gastric cancer currently[38].
EGD requires practical skills obtained by extensive training[39]. Endoscopic education is based predominantly on practicing on patients under the supervision of teaching staff (experienced endoscopists) and upper GI endoscopy dexterity is acquired over several hundred procedures. However, trainees may differ considerably in the rate at which they acquire the necessary psychomotor skills, although evidence suggests that most will arrive at the common end point, i.e., procedural competence, in time. Active performance of the technical skills cannot be substituted with didactic demonstrations; the skills require hands-on teaching. Thus, it is hard to convey verbally or in writing precisely how an EGD should be performed because the assessment of procedural skills is very subjective. However, it is not desirable to attempt an endoscopy without proper preparation. This manuscript can be helpful in acquiring endoscopy procedural skills from a theoretical perspective, through text and photos. In conclusion, we hope our elaborate manuscript helps to improve the performance of EGD by beginners. Additionally, we believe that, if beginners learn how to perform EGD properly through an adequate training program, and then offer the service on patients, it can promote public health.
P- Reviewer: Homan M, Tan HJ S- Editor: Ma YJ L- Editor: A E- Editor: Liu XM
| 1. | Oh MG, Han MA, Park J, Ryu SY, Park CY, Choi SW. Health behaviors of cancer survivors: the Fourth Korea National Health and Nutrition Examination Survey (KNHANES IV, 2007-09). Jpn J Clin Oncol. 2013;43:981-987. [RCA] [PubMed] [DOI] [Full Text] [Cited by in Crossref: 21] [Cited by in RCA: 22] [Article Influence: 1.8] [Reference Citation Analysis (2)] |
| 2. | Park CH, Kim EH, Chung H, Lee H, Park JC, Shin SK, Lee YC, An JY, Kim HI, Cheong JH. The optimal endoscopic screening interval for detecting early gastric neoplasms. Gastrointest Endosc. 2014;80:253-259. [RCA] [PubMed] [DOI] [Full Text] [Cited by in Crossref: 22] [Cited by in RCA: 21] [Article Influence: 1.9] [Reference Citation Analysis (0)] |
| 3. | Early DS, Ben-Menachem T, Decker GA, Evans JA, Fanelli RD, Fisher DA, Fukami N, Hwang JH, Jain R, Jue TL. Appropriate use of GI endoscopy. Gastrointest Endosc. 2012;75:1127-1131. [RCA] [PubMed] [DOI] [Full Text] [Cited by in Crossref: 156] [Cited by in RCA: 179] [Article Influence: 13.8] [Reference Citation Analysis (0)] |
| 4. | Evans JA, Early DS, Fukami N, Ben-Menachem T, Chandrasekhara V, Chathadi KV, Decker GA, Fanelli RD, Fisher DA, Foley KQ. The role of endoscopy in Barrett’s esophagus and other premalignant conditions of the esophagus. Gastrointest Endosc. 2012;76:1087-1094. [RCA] [PubMed] [DOI] [Full Text] [Cited by in Crossref: 262] [Cited by in RCA: 241] [Article Influence: 18.5] [Reference Citation Analysis (1)] |
| 5. | Evans JA, Early DS, Chandraskhara V, Chathadi KV, Fanelli RD, Fisher DA, Foley KQ, Hwang JH, Jue TL, Pasha SF. The role of endoscopy in the assessment and treatment of esophageal cancer. Gastrointest Endosc. 2013;77:328-334. [RCA] [PubMed] [DOI] [Full Text] [Cited by in Crossref: 89] [Cited by in RCA: 94] [Article Influence: 7.8] [Reference Citation Analysis (0)] |
| 6. | Hirota WK, Zuckerman MJ, Adler DG, Davila RE, Egan J, Leighton JA, Qureshi WA, Rajan E, Fanelli R, Wheeler-Harbaugh J. ASGE guideline: the role of endoscopy in the surveillance of premalignant conditions of the upper GI tract. Gastrointest Endosc. 2006;63:570-580. [RCA] [PubMed] [DOI] [Full Text] [Cited by in Crossref: 369] [Cited by in RCA: 315] [Article Influence: 16.6] [Reference Citation Analysis (0)] |
| 7. | Kim HS, Baik SJ, Kim KH, Oh CR, Lee JH, Jo WJ, Kim HK, Kim EY, Kim MJ. Prevalence of and risk factors for gastrointestinal diseases in korean americans and native koreans undergoing screening endoscopy. Gut Liver. 2013;7:539-545. [RCA] [PubMed] [DOI] [Full Text] [Full Text (PDF)] [Cited by in Crossref: 17] [Cited by in RCA: 14] [Article Influence: 1.2] [Reference Citation Analysis (0)] |
| 8. | Joo NS. Esophagastroduodenoscopic Training in the Family Physician Residency Program. Korean J Fam Med. 2010;31:585-586. [RCA] [DOI] [Full Text] [Cited by in Crossref: 2] [Cited by in RCA: 2] [Article Influence: 0.1] [Reference Citation Analysis (0)] |
| 9. | Lee KM, Choi SR, Jang BI, Kim SH, Kang CD, Kim YD, Park JY, Chung IK. Education and Training Guidelines for the Board of the Korean Society of Gastrointestinal Endoscopy. Korean J Gastrointest Endosc. 2011;42:207-214. |
| 10. | Chun JH, Yoon YS, Oh SW, Lee ES, Kim MG, Kim YS, Kim YH, Yang J. Current State and Demand of Esophagogastroduodenoscopy Training in Family Practice Residency Programs. J Korean Acad Fam Med. 2003;24:1092-1098. |
| 12. | Park KH, Sung NJ, Lee DW, Jeong HS. Technical Competency of the Esophgogastroduodenoscopy (EGD) during the First 50 EGDs: The Training Result of Family Medicine Residents in a University Hospital. Korean J Fam Med. 2010;31:595-599. [RCA] [DOI] [Full Text] [Cited by in Crossref: 1] [Cited by in RCA: 1] [Article Influence: 0.1] [Reference Citation Analysis (0)] |
| 13. | Catalano MF. Training in upper gastrointestinal endoscopy. Gastrointest Endosc Clin N Am. 1994;4:623-638. [PubMed] |
| 14. | Xiong X, Barkun AN, Waschke K, Martel M. Current status of core and advanced adult gastrointestinal endoscopy training in Canada: Survey of existing accredited programs. Can J Gastroenterol. 2013;27:267-272. [PubMed] |
| 15. | ASGE guidelines for clinical application. Statement on role of short courses in endoscopic training. American Society for Gastrointestinal Endoscopy. Gastrointest Endosc. 1999;50:913-914. [PubMed] |
| 16. | Dumonceau JM, Riphaus A, Beilenhoff U, Vilmann P, Hornslet P, Aparicio JR, Dinis-Ribeiro M, Giostra E, Ortmann M, Knape JT. European curriculum for sedation training in gastrointestinal endoscopy: position statement of the European Society of Gastrointestinal Endoscopy (ESGE) and European Society of Gastroenterology and Endoscopy Nurses and Associates (ESGENA). Endoscopy. 2013;45:496-504. [RCA] [PubMed] [DOI] [Full Text] [Cited by in Crossref: 53] [Cited by in RCA: 66] [Article Influence: 5.5] [Reference Citation Analysis (0)] |
| 17. | Chini P, Draganov PV. Diagnosis and management of ampullary adenoma: The expanding role of endoscopy. World J Gastrointest Endosc. 2011;3:241-247. [RCA] [PubMed] [DOI] [Full Text] [Full Text (PDF)] [Cited by in CrossRef: 56] [Cited by in RCA: 52] [Article Influence: 3.7] [Reference Citation Analysis (0)] |
| 19. | Lee IL, Wu CS. Less patient discomfort by one-man colonoscopy examination. Int J Clin Pract. 2006;60:635-638. [RCA] [PubMed] [DOI] [Full Text] [Cited by in Crossref: 10] [Cited by in RCA: 11] [Article Influence: 0.6] [Reference Citation Analysis (0)] |
| 20. | Byun YH, Lee JH, Park MK, Song JH, Min BH, Chang DK, Kim YH, Son HJ, Rhee PL, Kim JJ. Procedure-related musculoskeletal symptoms in gastrointestinal endoscopists in Korea. World J Gastroenterol. 2008;14:4359-4364. [PubMed] |
| 21. | Kuwabara T, Urabe Y, Hiyama T, Tanaka S, Shimomura T, Oko S, Yoshihara M, Chayama K. Prevalence and impact of musculoskeletal pain in Japanese gastrointestinal endoscopists: a controlled study. World J Gastroenterol. 2011;17:1488-1493. [RCA] [PubMed] [DOI] [Full Text] [Full Text (PDF)] [Cited by in CrossRef: 34] [Cited by in RCA: 41] [Article Influence: 2.9] [Reference Citation Analysis (0)] |
| 22. | Kang SH, Hyun JJ. Preparation and patient evaluation for safe gastrointestinal endoscopy. Clin Endosc. 2013;46:212-218. [RCA] [PubMed] [DOI] [Full Text] [Full Text (PDF)] [Cited by in Crossref: 13] [Cited by in RCA: 13] [Article Influence: 1.1] [Reference Citation Analysis (0)] |
| 23. | Ende A, Zopf Y, Konturek P, Naegel A, Hahn EG, Matthes K, Maiss J. Strategies for training in diagnostic upper endoscopy: a prospective, randomized trial. Gastrointest Endosc. 2012;75:254-260. [RCA] [PubMed] [DOI] [Full Text] [Cited by in Crossref: 45] [Cited by in RCA: 45] [Article Influence: 3.5] [Reference Citation Analysis (0)] |
| 24. | Maekita T, Kato J, Nakatani Y, Enomoto S, Takano E, Tsuji M, Nakaya T, Moribata K, Muraki Y, Shingaki N. Usefulness of continuous suction mouthpiece during esophagogastroduodenoscopy: A single-center, prospective, randomized study. World J Gastrointest Endosc. 2013;5:508-513. [RCA] [PubMed] [DOI] [Full Text] [Full Text (PDF)] [Cited by in CrossRef: 2] [Cited by in RCA: 2] [Article Influence: 0.2] [Reference Citation Analysis (1)] |
| 25. | Safránek J, Geiger J, Klecka J, Skalický T, Spidlen V, Veselý V, Vodicka J. [Mediastinitis after esophageal perforation]. Rozhl Chir. 2013;92:195-200. [PubMed] |
| 26. | Koo JS, Choi JH. Conscious Sedation During Gastrointestinal Endoscopy: Midazolam vs Propofol. Korean J Gastrointest Endosc. 2011;42:67-73. |
| 27. | Kusano M, Hosaka H, Moki H, Shimoyama Y, Kawamura O, Kuribayashi S, Mori M, Akuzawa M. Cascade stomach is associated with upper gastrointestinal symptoms: a population-based study. Neurogastroenterol Motil. 2012;24:451-455, e214. [RCA] [PubMed] [DOI] [Full Text] [Cited by in Crossref: 12] [Cited by in RCA: 15] [Article Influence: 1.2] [Reference Citation Analysis (0)] |
| 28. | Cammarota G, Cesaro P, Cazzato A, Cianci R, Fedeli P, Ojetti V, Certo M, Sparano L, Giovannini S, Larocca LM. The water immersion technique is easy to learn for routine use during EGD for duodenal villous evaluation: a single-center 2-year experience. J Clin Gastroenterol. 2009;43:244-248. [RCA] [PubMed] [DOI] [Full Text] [Cited by in Crossref: 23] [Cited by in RCA: 36] [Article Influence: 2.3] [Reference Citation Analysis (0)] |
| 29. | Cammarota G, Pirozzi GA, Martino A, Zuccalà G, Cianci R, Cuoco L, Ojetti V, Landriscina M, Montalto M, Vecchio FM. Reliability of the “immersion technique” during routine upper endoscopy for detection of abnormalities of duodenal villi in patients with dyspepsia. Gastrointest Endosc. 2004;60:223-228. [PubMed] |
| 30. | Singer HC, Reichbach EJ, Fagin RR, Kobayashi S. Retroversion as a routine gastroscopic maneuver. Gastrointest Endosc. 1971;17:112-114 passim. [PubMed] |
| 31. | Parkin DM, Bray F, Ferlay J, Pisani P. Global cancer statistics, 2002. CA Cancer J Clin. 2005;55:74-108. [PubMed] |
| 32. | Ellis L, Woods LM, Estève J, Eloranta S, Coleman MP, Rachet B. Cancer incidence, survival and mortality: explaining the concepts. Int J Cancer. 2014;135:1774-1782. [RCA] [PubMed] [DOI] [Full Text] [Cited by in Crossref: 100] [Cited by in RCA: 110] [Article Influence: 10.0] [Reference Citation Analysis (0)] |
| 33. | Shin A, Kim J, Park S. Gastric cancer epidemiology in Korea. J Gastric Cancer. 2011;11:135-140. [RCA] [PubMed] [DOI] [Full Text] [Full Text (PDF)] [Cited by in Crossref: 133] [Cited by in RCA: 139] [Article Influence: 9.9] [Reference Citation Analysis (0)] |
| 34. | Fock KM. Review article: the epidemiology and prevention of gastric cancer. Aliment Pharmacol Ther. 2014;40:250-260. [RCA] [PubMed] [DOI] [Full Text] [Cited by in Crossref: 261] [Cited by in RCA: 308] [Article Influence: 28.0] [Reference Citation Analysis (0)] |
| 35. | Lapalus MG, Dumortier J, Fumex F, Roman S, Lot M, Prost B, Mion F, Ponchon T. Esophageal capsule endoscopy versus esophagogastroduodenoscopy for evaluating portal hypertension: a prospective comparative study of performance and tolerance. Endoscopy. 2006;38:36-41. [RCA] [PubMed] [DOI] [Full Text] [Cited by in Crossref: 78] [Cited by in RCA: 77] [Article Influence: 4.1] [Reference Citation Analysis (0)] |
| 36. | Choi KS, Jun JK, Park EC, Park S, Jung KW, Han MA, Choi IJ, Lee HY. Performance of different gastric cancer screening methods in Korea: a population-based study. PLoS One. 2012;7:e50041. [RCA] [PubMed] [DOI] [Full Text] [Full Text (PDF)] [Cited by in Crossref: 88] [Cited by in RCA: 113] [Article Influence: 8.7] [Reference Citation Analysis (0)] |
| 37. | Cho E, Kang MH, Choi KS, Suh M, Jun JK, Park EC. Cost-effectiveness outcomes of the national gastric cancer screening program in South Korea. Asian Pac J Cancer Prev. 2013;14:2533-2540. [PubMed] |
| 38. | Kim N. Screening and Diagnosis of Early Gastric Cancer. J Korean Med Assoc. 2010;53:290-298. [RCA] [DOI] [Full Text] [Cited by in Crossref: 5] [Cited by in RCA: 5] [Article Influence: 0.3] [Reference Citation Analysis (0)] |
| 39. | Ponich T, Enns R, Romagnuolo J, Springer J, Armstrong D, Barkun AN. Canadian credentialing guidelines for esophagogastroduodenoscopy. Can J Gastroenterol. 2008;22:349-354. [PubMed] |


