Published online Apr 24, 2018. doi: 10.5500/wjt.v8.i2.38
Peer-review started: January 4, 2018
First decision: February 9, 2018
Revised: March 6, 2018
Accepted: April 1, 2018
Article in press: April 1, 2018
Published online: April 24, 2018
Processing time: 109 Days and 22.7 Hours
The first lung transplantation in the rat was achieved by Asimacopoulos et al using sutured anastomoses in 1971. Subsequent development of a cuffed technique to construct the anastomoses by Mizuta and colleagues in 1989 represented a breakthrough that resulted in simplification of the procedure and shorter warm ischemic times. Since then, a number of further variations on the technique of rat lung transplantation have been described. In spite of this, the procedure remains technically demanding and involves a long learning curve. This minireview describes the following new technical safeguards to further evolve the technique for cuffed anastomoses in rat lung transplantation: the use of anatomical landmarks to avoid twisting of the everted donor pulmonary vein and bronchus in the cuff, the use of the cuff tie as a landmark to avoid twisting of the anastomotic cuffs relative to the recipient vessels, distal ties on the recipient vessels to achieve a bloodless field and triangulation of the venotomy to avoid pulmonary vein tearing.
Core tip: This minireview describes the following new technical safeguards to further evolve the technique for cuffed anastomoses in rat lung transplantation: the use of anatomical landmarks to avoid twisting of the everted donor pulmonary vein and bronchus in the cuff, the use of the cuff tie as a landmark to avoid twisting of the anastomotic cuffs relative to the recipient vessels, distal ties on the recipient vessels to achieve a bloodless field and triangulation of the venotomy to avoid pulmonary vein tearing.
- Citation: Rajab TK. Anastomotic techniques for rat lung transplantation. World J Transplant 2018; 8(2): 38-43
- URL: https://www.wjgnet.com/2220-3230/full/v8/i2/38.htm
- DOI: https://dx.doi.org/10.5500/wjt.v8.i2.38
The first lung transplantation in the rat was achieved by Asimacopoulos et al[1] using sutured anastomoses in 1971. However, high complication rates and technical difficulties with the sutured anastomoses meant that this technique was not widely adopted. Subsequent development of a cuffed technique to construct the anastomoses by Mizuta et al[2] in 1989 represented a breakthrough that resulted in simplification of the procedure and shorter warm ischemic times. This technical breakthrough led to a surge in publications involving rat lung transplantation[3].
Since then, a number of further variations on the technique of rat lung transplantation have been described. In spite of this, the procedure remains technically demanding and involves a long learning curve[4]. Therefore many laboratories rely on dedicated microsurgeons who invest great deal of commitment and time in order to become facile with this model. However, the frequent turn-over of researchers in many laboratories calls for further technical improvements that shorten the learning curve and provide more reproducible outcomes by providing safeguards against complications. Here we describe in detail technical improvements and safeguards to further evolve the cuffed technique for rat lung transplantation.
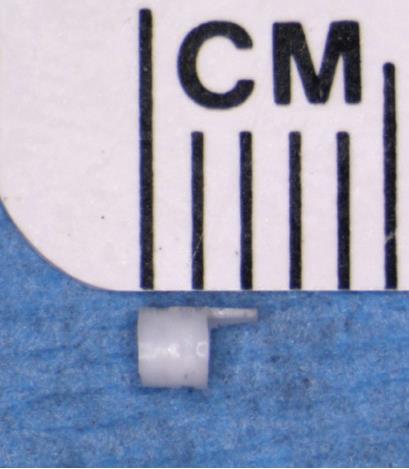
Anastomotic cuffs should be made from PTFE, since this material was found to cause little foreign body reaction[5]. PTFE is also the most commonly used graft material for small caliber arteriovenous bypass grafting in human patients[6]. The anastomotic cuffs are made from PTFE angiocatheters that are clinically used for peripheral venous access (Exel Safelet Catheter, Exel International, Los Angeles, CA, United States). The angiocatheters are cut into sections of approximately 2 mm length, of which 1 mm forms the body of the cuff and a 1 mm elongation forms a wing (Figure 1)[7]. The wing is used to hold the cuff while the donor vessel is everted over the cuff. Additionally, we impress two grooves on the cuff with the back of a razor blade against the stylet of the angiocatheter to facilitate positioning of the circumferential ties[8]. Additionally, the surfaces of the cuff can be roughened with sandpaper to make the donor vessels less prone to slip while they are everted over the cuff[9,10].
Eighteen gauge and 16 gauge angiocatheters for the pulmonary artery (PA) and the pulmonary vein (PV) respectively for donor rats weighing approximately 300 g are used. Other investigators have used cuff sizes ranging from 24 gauge to 16 gauge for both PA and PV anastomoses[4,9-11]. We advocate against using small venous cuffs since a sufficiently large venous anastomosis is important to minimize complications from PV thrombosis. Smaller arterial cuffs are more acceptable since the pressure gradient across the arterial anastomosis is much higher than the pressure gradient across the venous anastomosis. For the bronchial anastomosis we also use 16 gauge cuffs. Others have used 14 gauge cuffs for the bronchus[9]. A large bronchial cuff size to optimize aeration of the donor lung is not unreasonable since the tough cartilaginous rings of the bronchus make this structure most resistant to tearing.
Surgical magnification is necessary to perform rat lung transplantation. A 10 x dissection microscope (AmScope, Irvine, CA, United States) is ideal for hilar dissection and anastomoses. Others have described using 6-20 x magnification[4]. Ideally, frequent changing of the magnification strength should be avoided, since this negatively affects hand-eye coordination.
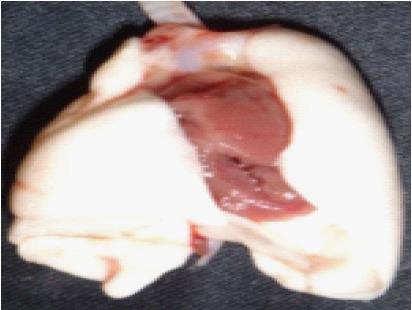
To prepare the donor lungs for anastomosis, it is necessary to isolate the donor PA, bronchus (B) and PV. This dissection starts with the heart-lung block in its anatomic position (Figure 2).
First, the PA is exposed by excising the thymus fat. The PA bifurcation is freed from the aortic arch by dividing the ligamentum arteriosum. The left PA is then divided at the bifurcation. Subsequently the left PA is circumferentially dissected free and traced towards the hilum of the lung.
Second, the bifurcation of the trachea is exposed by excising the surrounding mediastinal fat and lymphatic tissue. The left trachea is divided at its bifurcation and also circumferentially dissected free and traced towards the hilum of the lung.
Third, exposure of the PV, which lies dorsally, is improved by flipping the heart-lung block into prone position. The PV is freed from its attachments starting at its origin at the left atrium. Careful dissection of the vein is particularly important since the PV tears easily. Moreover, the pleura should be completely stripped from the vein in order to achieve the maximum PV length. Sufficient PV length is important to facilitate eversion of the PV over the cuff, since the elastic veins tend to retract. To free the proximal end of the vein, the left atrium is cut, leaving a rim of atrium on the ostium of the PV. The atrial rim greatly facilitates eversion of the PV over the venous cuff and does not interfere with perfusion of the anastomosis since it does not form part of the anastomotic lumen. The PV is then traced towards the hilum of the lung.
Fourth, the donor graft is freed from the remaining attachments to the heart. Each vessel is now carefully traced further towards the hilum by dissecting off the remaining parietal pleura in order to fully isolate the PA, B and PV. Isolation of the vessels serves to maximize the length of each vessel for eversion over the cuffs and prevents kinks after implantation of the graft.
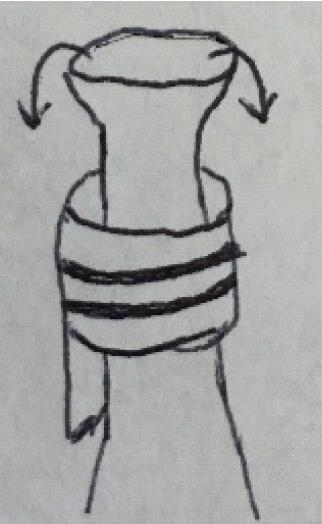
Attachment of the cuffs should be performed on a tray covered with ice to control the temperature of the graft. The PV anastomosis is attached first, since the PV usually retracts to become the shortest vessel. This allows adjustment of the longer vessels to the same length as the cuffed PV. The cuff is held in place at the wing and the PV is pulled through the cuff. Next, the vein is everted over the cuff (Figure 3).
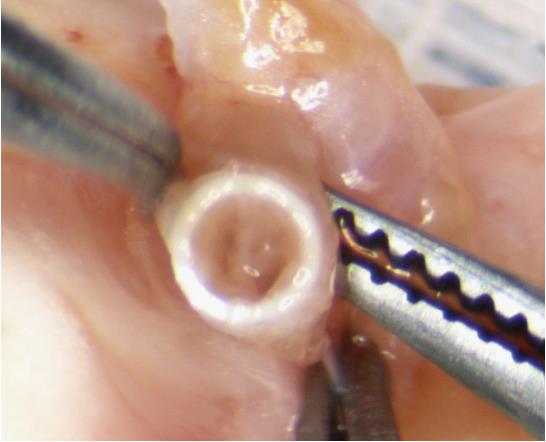
It is very important to avoid twisting the vein inside the cuff. In order to confirm that the vein is not twisted, the ostia of the superior and inferior lobar veins should be visualized inside the everted vein. If these ostia are found to be mal-aligned then the vessel should be rotated inside the cuff to orient them superiorly and inferiorly respectively (Figure 4).
When adequate orientation of the vein is confirmed, the everted vein is secured to the cuff with a circumferential tie. We use a 7-0 silk, but others have used 8-0 monofilaments[2]. The first loop secures the everted vessel to the middle of the cuff using a single knot. This loop need not enclose the entire circumference of the everted vessel as long as it holds the vessel in place. The ends of the tie are then looped around the everted vessel another time, this time close to the edge of the cuff. This loop is intended to form a circumferential seal around the everted vessel and is secured with two throws. The knots should be tied facing anterior relative to the donor lung. This allows the knot to serve as an anterior landmark to orient the cuff inside in the recipient vessel without twisting.
The bronchial cuff is attached second. Usually the bronchus is longer than the PV, so it needs to be cut to a length that is appropriate relative to the PV after it is pulled through the cuff. Twisting of the bronchus inside the cuff is avoided by orienting the membranous part of the bronchus posteriorly. The bronchus is everted over the cuff and secured to the cuff in the same fashion as the PV.
The PA cuff is attached last. The PA usually also needs to be cut to a length that is appropriate relative to the venous cuff. Analogous to the PV and bronchus, the PA is pulled through the cuff, everted and secured to the cuff in the same fashion as the PV. Special attention needs to be paid to avoid twisting the PA before everting it over the cuff, since there are no anatomical landmarks to help with its orientation. However, since the pressure inside the PA is higher than inside the PV or bronchus, perfusion of the arterial cuff is most resistant to twisting. Finally, the wings are cut off all three cuffs.
After all cuffs have been attached, the lung is re-wrapped in soaked gauze. It is important to make sure that fluid does not enter the bronchus through capillary action. This can be achieved by folding the gauze so that the hilum is left free.
First, the recipient left lung is brought into the wound by putting traction on the inferior pole of the lung with two cotton swabs. Once the inferior pole of the lung has been mobilized, the remainder of the inferior pulmonary ligament can be divided with scissors. Care must be taken not to damage the pulmonary vein, which is confluent with the inferior pulmonary ligament. The tidal volume is decreased before the recipient lung is clamped and retracted ventrally. This affords excellent exposure of the dorsal aspect of the pulmonary hilum. The pleura over the dorsal pulmonary hilum is divided. Bronchial arteries, which originate from the aorta and typically running over the membranous part of the bronchus, need to be cauterized or tied. This allows dissection of the PA, bronchus and PV. Care should be taken not to damage the vagus nerve, which is often brought over the root of the hilum by traction on the recipient lung. Once the posterior aspect of PA, bronchus and PV are dissected free, the ventral aspect of the hilum is exposed by retracting the recipient lung dorsally. The animal is also re-positioned on its back. This improves visualization of the hilum since the dissection microscope provides a top view only. Next, the pleura over the ventral aspect of the hilum is divided. Division of the hilar pleura invariably causes a pneumothorax of the accessory lobe, since the accessory lobe pleura is fused with the pleura covering the left PV. However, it is usually possible to avoid causing a right sided pneumothorax by starting the dissection of the PV hilar pleura distally and carefully preserving the pleura overlying the proximal PV, which is continuous with the right parietal pleura. Subsequent dissection completely isolates the PA, bronchus and PV. Particular care should be taken while dissecting the pulmonary vein, since it can tear easily. The goal of this dissection should be to provide maximum length of the recipient hilar vessels, since this makes it easier to create the anastomoses. In order to further increase the length of the donor vessels, the right accessory lobe vein can be divided[11] or interposition grafts can be fashioned from the donor descending aorta[7]. These additional steps are not necessary in rats weighing 300 g since sufficient length can be achieved by careful dissection.
The PV anastomosis is technically the most difficult because the recipient vein tears easily. We create the PV anastomosis first, since this affords the greatest degree of freedom to position the graft favorably so that the PV cuff can be pushed into the recipient vein without tension. It is important to avoid twisting the vein during creation of the anastomoses since the low blood pressure in the PV means that blood flow is compromised by relatively modest twisting or kinking. In order to minimize the potential for PV twisting or kinking, others have advocated constructing the bronchial anastomosis first to immobilize the graft before the PV anastomosis is constructed[9].
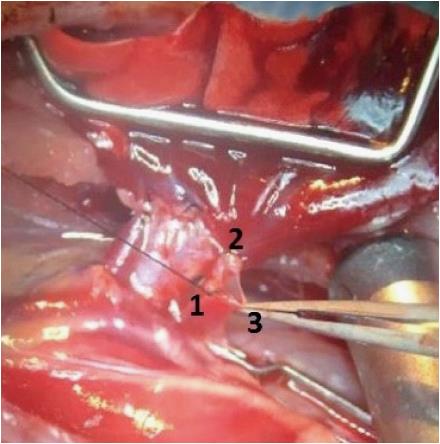
The PV typically forms from the confluence of an upper and a lower segmental vein. Rarely, the PV forms from the confluence of 3 or more veins. First, the upper segmental vein is divided between two ligatures. This increases the length of the vessel that is available to create the anastomosis. Moreover, leaving one strand of the proximal ligature long allows it to serve as a handle to triangulate the venotomy. Second, the distal PA is tied off with 7-0 silk to stop inflow of blood into the lung. It is important that this tie sits as distal as possible to maximize the length of PA available for anastomosis. Third, the remaining segmental PVs are tied off as distal as possible and the main PV is clamped as proximal as possible. This prevents antegrade or retrograde flow of blood into the part of the PV that will be used for the anastomosis. A bloodless represents an important safeguard for creating the anastomosis without tearing since it improves visualization. Fourth, the pulmonary vein is opened transversely with a microscissor. Again the venotomy should be as distal as possible to ensure sufficient length of the vessel is available to insert the cuff. The venotomy is then extended longitudinally along the vein to the ostium of the tied superior segmental vein. This maneuver opens a right-angled flap in the vein and allows triangulation of the venotomy between the long suture handle on the superior segmental vein, the intact back wall of the vein and a forceps holding the tip of the flap (Figure 5).
Triangulation is another important safeguard against tearing the fragile vein by opening a wide mouthed venotomy. Fifth, all blood is washed from the venotomy with heparinized saline. We use 50u, but others have used 500u[11]. The heparinized saline also displaces any air in the vein and thus acts as a safeguard against thrombi and against air emboli. Similarly, the donor PV cuff is filled with heparinized saline to displace any air. Sixth, the donor lung is brought up to the field and sandwiched between cooled wet gauze sponges. The graft is positioned such that the PV cuff is not under tension or twisted when it is inserted into the recipient vein. Finally, the cuff is then inserted into the venotomy and pushed into the recipient main PV. The correct orientation is preserved by using the knot on the anastomotic cuff as an anterior landmark. It is important to make sure that the cuff projects into the main PV to avoid any constriction of the graft venous outflow. The cuff is secured with a circumferential 6-0 silk tie.
The bronchial anastomosis is created second. In small rats it can be beneficial not to clamp the bronchus to avoid cluttering the field with clamps. In this case, the bronchial anastomosis needs to be completed quickly since the native contralateral lung is not ventilated while the left bronchus is open. First, the donor lung is re-positioned so that there is no tension on the bronchial cuff after insertion into the bronchus. Avoiding tension prevents the cuff from slipping out of the recipient bronchus while the anastomosis is created. Second, the bronchus is incised distally between two cartilaginous rings. Intact cartilaginous ring make the bronchiotomy relatively resistant to tearing. Third, the cuff is inserted into the bronchus. The correct orientation is preserved by using the knot on the anastomotic cuff as an anterior landmark. Finally, the cuff is secured with a 6-0 silk tie. Following creation of the bronchial cuff, the tidal volume should be increased to baseline in order to accounting for the dead space of the non-perfused donor lung. Rarely, the bronchial anastomosis is constructed with sutures[4,12]. Studies with computer tomography have noted that rat bronchial anastomoses created by suturing have a trend to be wider than cuffed bronchial anastomoses, however this difference was not statistically significant[13]. We have not noted major problems with aeration of the graft if a sufficiently large cuff is used. Large cuffs can be used easily for the bronchial anastomosis since the bronchus is relative resistant to tearing.
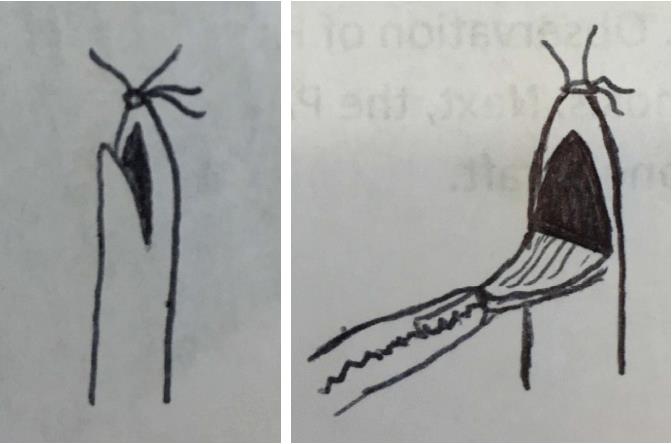
The PA anastomosis is created third. First, the donor lung is again re-positioned to allow creation of the PA anastomosis without tension. Second, the artery is clamped proximally to control inflow into the segment that will be used to construct the anastomosis. Third, a V-shaped arteriotomy is made as close to the tie as possible to maximize the available length for anastomosis (Figure 6). This creates a wide mouthed arteriotomy. Fourth, the PA lumen is flushed with heparinized saline to remove any clots that may have formed in the occluded vessel and to displace any air. Similarly, air is displaced from the donor PA cuff by filling it with heparinized saline. The apex of the V-shaped flap provides a convenient handle for retraction to open a wide mouthed arteriotomy. Fifth, PA cuff is inserted into the PA. The correct orientation is preserved by using the knot on the anastomotic cuff as an anterior landmark. Finally, the cuff is secured with a circumferential 6-0 silk tie. Insertion of the PA cuff is easier than insertion of the venous cuff because the PA is elastic and far less prone to tears.
After all anastomoses have been completed, the old recipient lung is removed by cutting PA, bronchus and PV distal to the new anastomoses. This removes tension from the hilar vessels and allows the donor graft to sit in the orthotropic position. The donor lung is recruited by occluding the ventilator outflow in order for approximately 3 breaths. Recruitment of the graft before the clamps are released decreases the pulmonary vascular resistance of the donor lung and ensures homogenous reperfusion. The PV clamp is released first. This allows observation of retrograde blood flow through the cuff into the donor PV and segmental PV branches. Observation of PV backflow is an important safeguard for the quality of the venous anastomosis. Second, the PA clamp is released. This results in an immediate blush that indicates perfusion of the donor graft. Observation of a blush is an important safeguard for the quality of the arterial anastomosis.
Development of the cuff technique for lung transplantation by Mizuta popularized this model[2]. This technique was evolved by adding important safeguards to shorten the learning curve and result in more reproducible outcomes by providing safeguards against complications. This review describes highlight technical safeguards that were previously described and also describes the following new safeguards as improvements to the technique for lung transplantation: The use of anatomical landmarks to avoid twisting of the everted donor PV and bronchus in the cuff, the use of the cuff tie as a landmark to avoid twisting of the anastomotic cuffs with regards to the recipient vessels, distal ties on the recipient vessels to achieve a bloodless field and triangulation of the venotomy to avoid PV tearing.
Manuscript source: Invited manuscript
Specialty type: Transplantation
Country of origin: United States
Peer-review report classification
Grade A (Excellent): 0
Grade B (Very good): B
Grade C (Good): 0
Grade D (Fair): 0
Grade E (Poor): 0
P- Reviewer: Said SAM S- Editor: Cui LJ L- Editor: A E- Editor: Wang CH
| 1. | Asimacopoulos PJ, Molokhia FA, Pegg CA, Norman JC. Lung transplantation in the rat. Transplant Proc. 1971;3:583-585. [PubMed] |
| 2. | Mizuta T, Kawaguchi A, Nakahara K, Kawashima Y. Simplified rat lung transplantation using a cuff technique. J Thorac Cardiovasc Surg. 1989;97:578-581. [PubMed] |
| 3. | Bribriesco AC, Li W, Nava RG, Spahn JH, Kreisel D. Experimental models of lung transplantation. Front Biosci (Elite Ed). 2013;5:266-272. [RCA] [PubMed] [DOI] [Full Text] [Cited by in Crossref: 16] [Cited by in RCA: 16] [Article Influence: 1.3] [Reference Citation Analysis (0)] |
| 4. | Kubisa B, Schmid RA, Grodzki T. Model of single left rat lung transplantation. Relation between surgical experience and outcomes. Rocz Akad Med Bialymst. 2003;48:70-73. [PubMed] |
| 5. | Reis A, Giaid A, Serrick C, Shennib H. Improved outcome of rat lung transplantation with modification of the nonsuture external cuff technique. J Heart Lung Transplant. 1995;14:274-279. [PubMed] |
| 6. | Kapadia MR, Popowich DA, Kibbe MR. Modified prosthetic vascular conduits. Circulation. 2008;117:1873-1882. [RCA] [PubMed] [DOI] [Full Text] [Cited by in Crossref: 98] [Cited by in RCA: 78] [Article Influence: 4.6] [Reference Citation Analysis (0)] |
| 7. | Goto T, Kohno M, Anraku M, Ohtsuka T, Izumi Y, Nomori H. Simplified rat lung transplantation using a new cuff technique. Ann Thorac Surg. 2012;93:2078-2080. [RCA] [PubMed] [DOI] [Full Text] [Cited by in Crossref: 7] [Cited by in RCA: 15] [Article Influence: 1.2] [Reference Citation Analysis (0)] |
| 8. | Sugimoto R, Nakao A, Nagahiro I, Kohmoto J, Sugimoto S, Okazaki M, Yamane M, Inokawa H, Oto T, Tahara K. Experimental orthotopic lung transplantation model in rats with cold storage. Surg Today. 2009;39:641-645. [RCA] [PubMed] [DOI] [Full Text] [Cited by in Crossref: 26] [Cited by in RCA: 25] [Article Influence: 1.6] [Reference Citation Analysis (0)] |
| 9. | Guo H, Nie J, Fan K, Zheng Z, Qiao X, Li J, Wang J, Jiang K. Improvements of surgical techniques in a rat model of an orthotopic single lung transplant. Eur J Med Res. 2013;18:1. [RCA] [PubMed] [DOI] [Full Text] [Full Text (PDF)] [Cited by in Crossref: 10] [Cited by in RCA: 20] [Article Influence: 1.7] [Reference Citation Analysis (0)] |
| 10. | Zhai W, Ge J, Inci I, Hillinger S, Markus C, Korom S, Weder W. Simplified rat lung transplantation by using a modified cuff technique. J Invest Surg. 2008;21:33-37. [RCA] [PubMed] [DOI] [Full Text] [Cited by in Crossref: 20] [Cited by in RCA: 22] [Article Influence: 1.3] [Reference Citation Analysis (0)] |
| 11. | Habertheuer A, Kocher A, Laufer G, Petzelbauer P, Andreas M, Aharinejad S, Ehrlich M, Wiedemann D. Innovative, simplified orthotopic lung transplantation in rats. J Surg Res. 2013;185:419-425. [RCA] [PubMed] [DOI] [Full Text] [Cited by in Crossref: 12] [Cited by in RCA: 12] [Article Influence: 1.0] [Reference Citation Analysis (0)] |
| 12. | Zhang QC, Wang DJ, Yin N, Yin BL, Fang RX, Xiao XJ, Wu YH. The orthotopic left lung transplantation in rats: a valuable experimental model without using cuff technique. Transpl Int. 2008;21:1090-1097. [RCA] [PubMed] [DOI] [Full Text] [Cited by in Crossref: 3] [Cited by in RCA: 5] [Article Influence: 0.3] [Reference Citation Analysis (0)] |
| 13. | Greschus S, Kuchenbuch T, Plötz C, Obert M, Traupe H, Padberg W, Grau V, Hirschburger M. Monitoring of experimental rat lung transplants by high-resolution flat-panel volumetric computer tomography (fpVCT). J Invest Surg. 2009;22:69-75. [RCA] [PubMed] [DOI] [Full Text] [Cited by in Crossref: 5] [Cited by in RCA: 5] [Article Influence: 0.3] [Reference Citation Analysis (0)] |


